
Retrofit Snow Melting for Existing Concrete & Asphalt Surface
Follow our detailed guide and learn how to install a snow melting system in an existing asphalt driveway

What is Snow Melting?
Have you ever seen snow fall on an already warm car? It melts instantly.
This is the essential idea behind snow melting systems—a heating element is embedded in your driveway (or patio, walkway, etc.) and it melts the snow that falls on it.
The heating element can either be tubes of heated water (hydronic) or electric cables. In asphalt pavement installations, the heating element should always be electric as the asphalt can reach temperatures of 330 degrees Fahrenheit, which can melt the tubes used in hydronic systems.
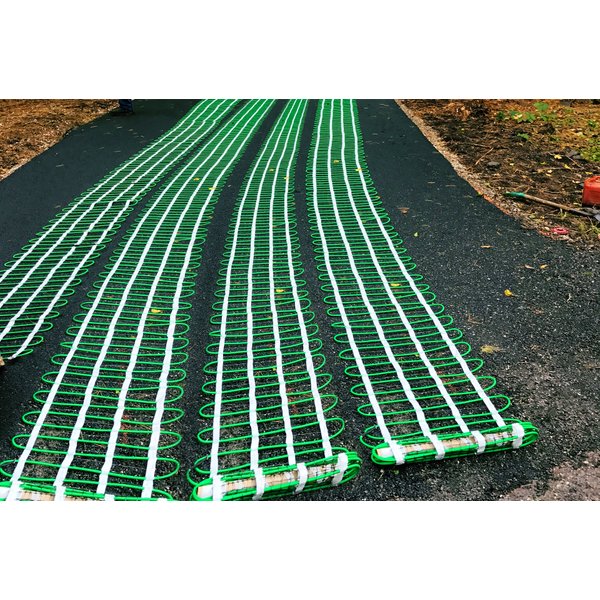
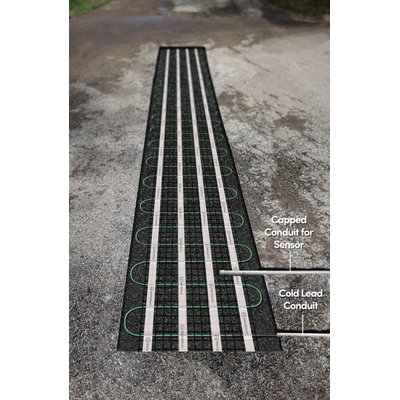
Electric snow melting systems, like our WarmlyYours snow melting cables and mats, are rated to withstand temperatures of up to 450 degrees Fahrenheit and they are also much easier to install, as they don't require costly boilers or pumps. This project used mats, which consist of heating cables attached to polypropylene mesh. They are very easy and fast to install.
Learn More About Snow MeltingWhat About Heating an Existing Driveway?
Snow can be beautiful, but it can also deliver a huge amount of inconvenience and even danger. When you have somewhere you need to be, like work or a doctor's appointment, winter can be your worst enemy.
By having a WarmlyYours snow melting system installed in your driveway, you can finally put away the rock-salt and shovels and start enjoying winter again without relying on a snow removal service. An existing driveway may sound like a challenge but, as this guide will show, installing a heated driveway system into an existing surface can be done.
This guide will walk you through a single snow melting project in an asphalt driveway from start to finish.
When to Install a Snow Melting System
Because the snow melting system is typically embedded within the driveway itself, the best time to install a snow melting system is when a driveway is either being created for the first time, redone, or expanded.
These kinds of projects are typically undertaken from late spring to late fall; however, for an existing driveway you'll want to consult with your local trade professionals about their availability to ensure that the saw cutting, electrical work, and groove filling can all be done within a reasonable timeframe.
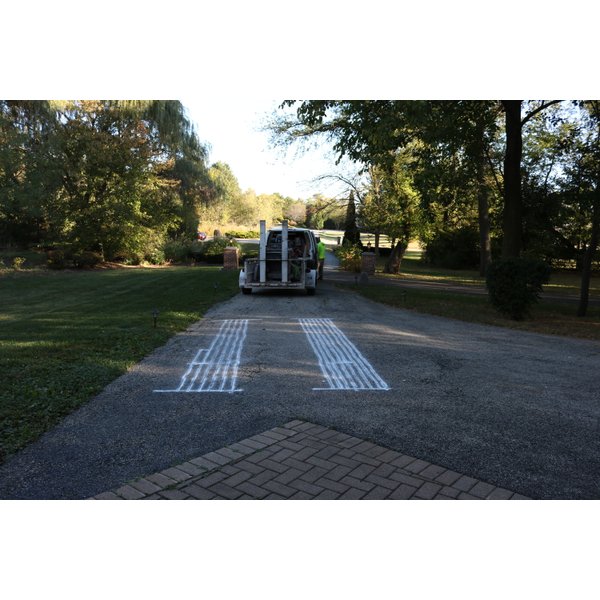
The example pictured is of a snow melting system addition into an existing driveway that began in mid-fall. The homeowners wanted to add snow melting tire track coverage near the front entrance of the house.
By retrofitting the snow melting system, they'll now have a clear place to park their car.
Because this snow melting system is electric, it can easily be added on to in the future if these homeowners decide to replace the original driveway at some point or just extend the current tracks.

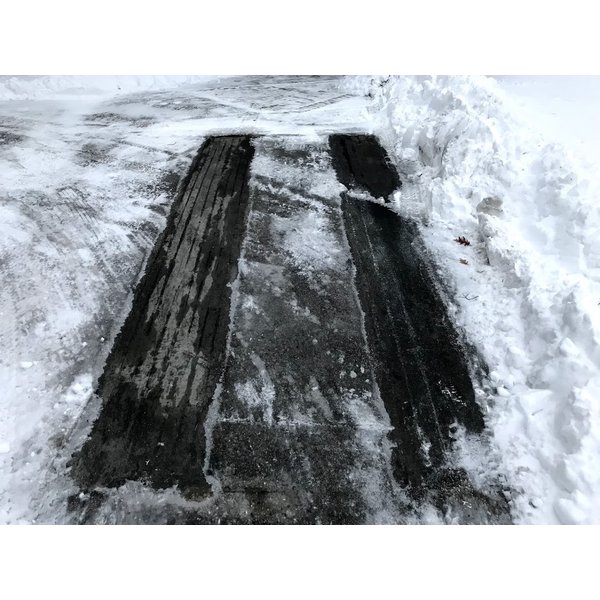
Full Coverage vs. Tire Tracks
You can choose to have your entire driveway project covered with snow melting, but one popular alternative to full coverage is to simply heat tire tracks.
This economical option helps users cut down on both installation and operating costs, while still providing great functionality.
This coverage system works by installing two sets of heating elements, typically 2 feet wide and the length of the driveway, which will keep the driveway passable, even in the heaviest of snow falls.
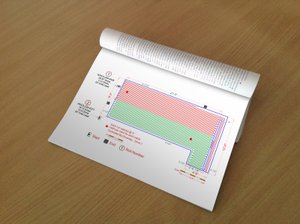
Start Smart with a Free SmartPlan
Perhaps the most important stage in installing a snow melting system is getting a good installation plan.
WarmlyYours provides a free, no-obligation SmartPlan that includes an installation plan, an electrical plan, and an itemized quote, all of which is prepared by a highly skilled team of engineers.
All you have to do to take advantage of this service is to provide WarmlyYours with a sketch of the project that includes dimensions and other relevant information, like where power will be most readily accessible.
Within typically one day of providing this information, you'll receive your free SmartPlan. The itemized quote included in your SmartPlan will also include MSRP pricing so that you can properly budget for your project.
Request a Free SmartPlan


Retrofitting the Snow Melting System
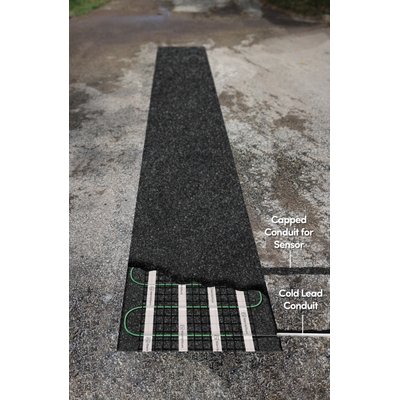
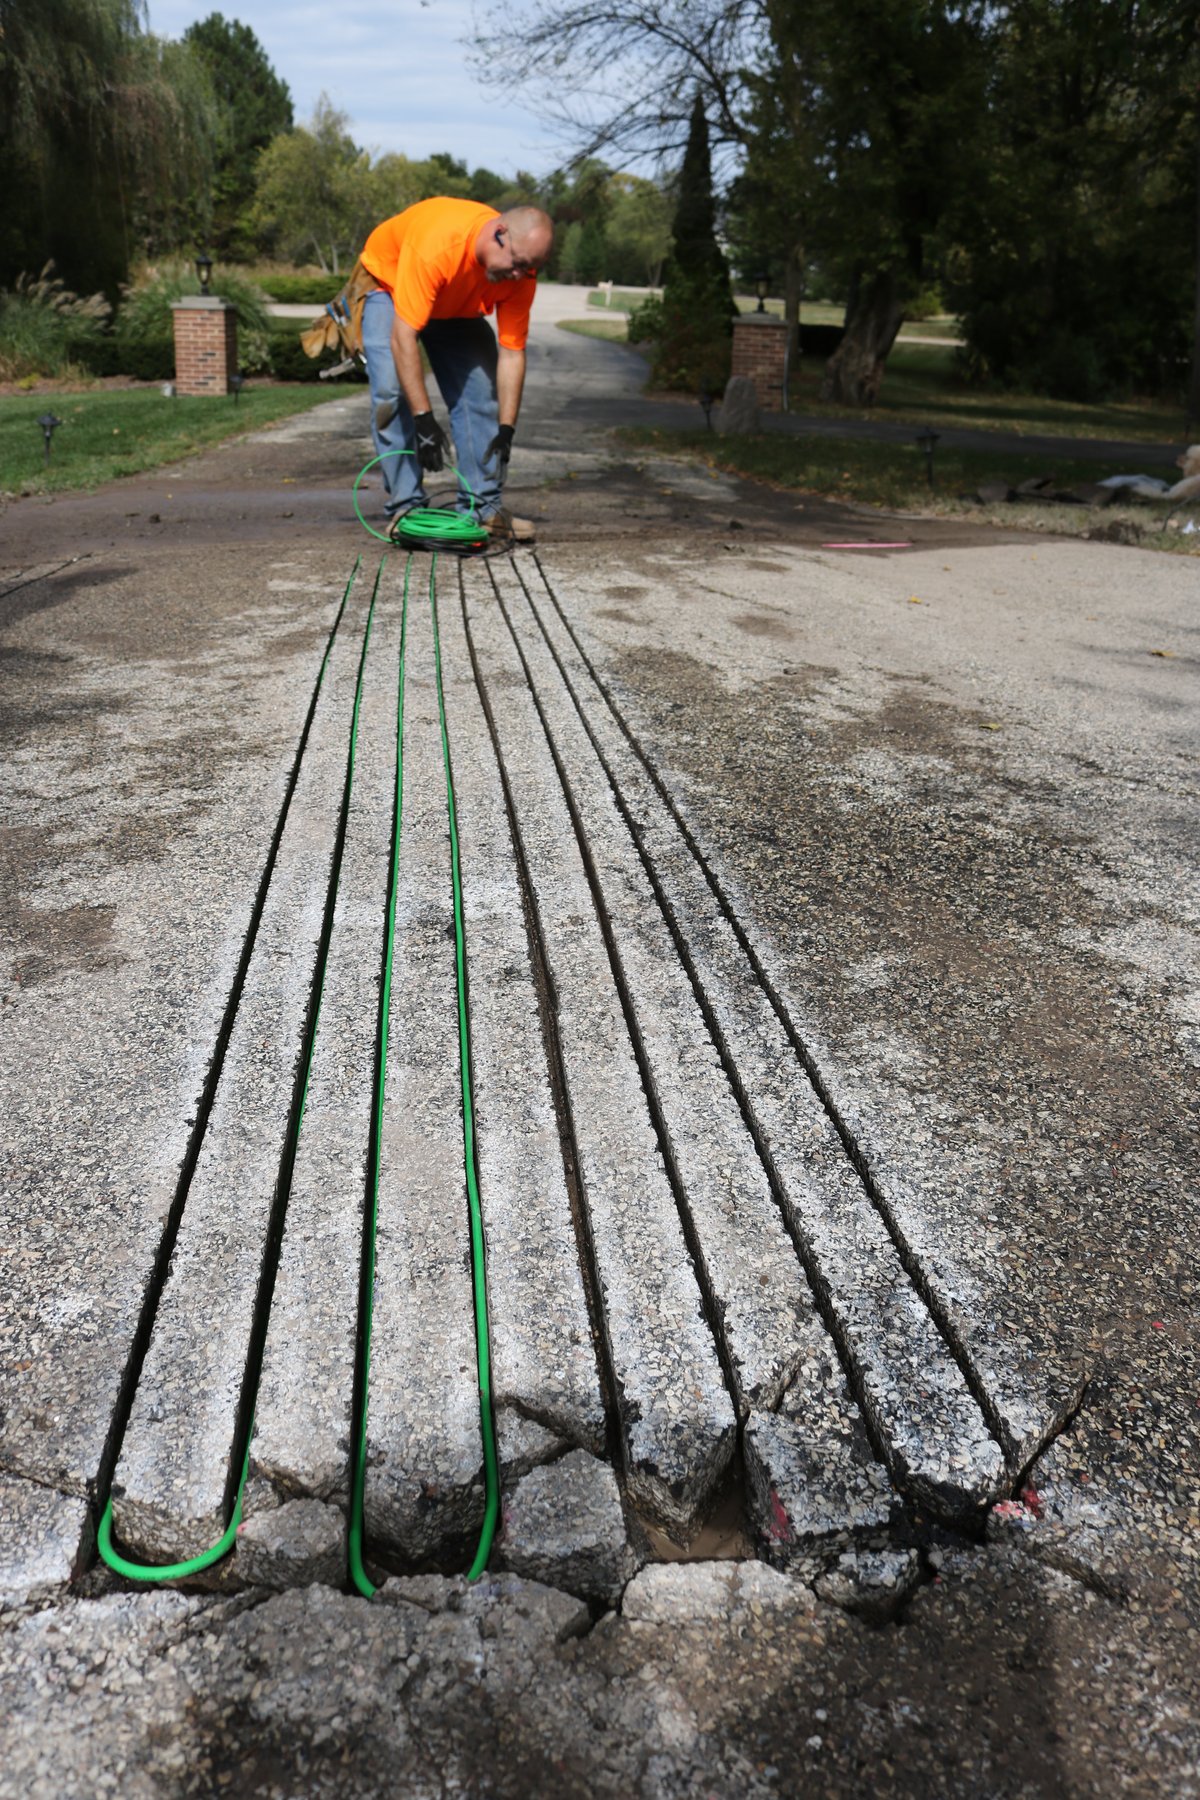
The retrofit installation of any snow melting system relies on proper layout and installation depth. In this project, we will be covering two 2’ x 15’ tire tracks in an asphalt driveway.
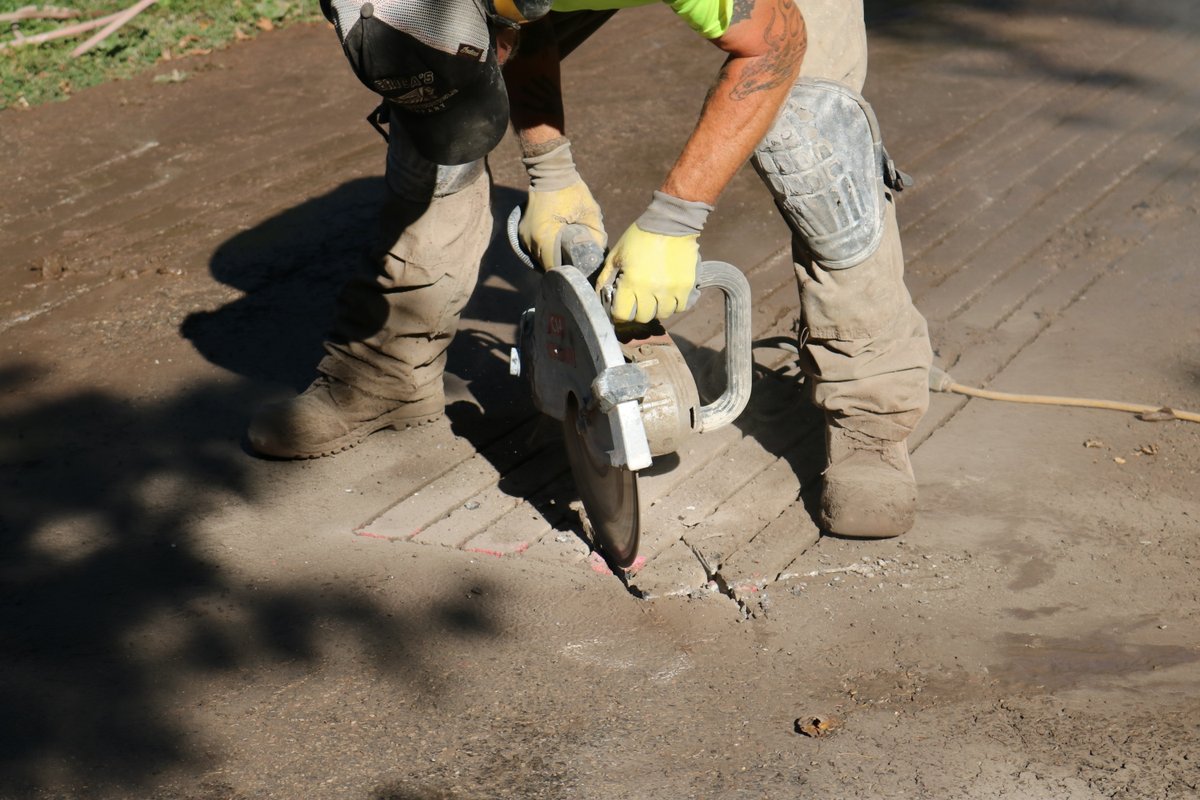
In this project, installation started with saw cutting into existing asphalt. We recommend that you consult with and plan this step with your contractor, since it may depend on the surface material and its condition.
Step 1. Measure and Mark the Saw Cutting Lines

Prior to beginning any digging, we suggest contacting a local utility locating/marking firm to make sure your project won't run into any gas, water, or electrical lines. Once that's done, you'll want to start with locating the area to be heated and then, marking the cable layout in that area according to the SmartPlan.
The recommended approach to marking the installation area is to spray paint the start and the end of the area with clear lines. Follow the spacing provided on the installation plan and mark the cuts with a chalk line. Ensure uniform spacing and verify the number of cuts as per the installation plan.
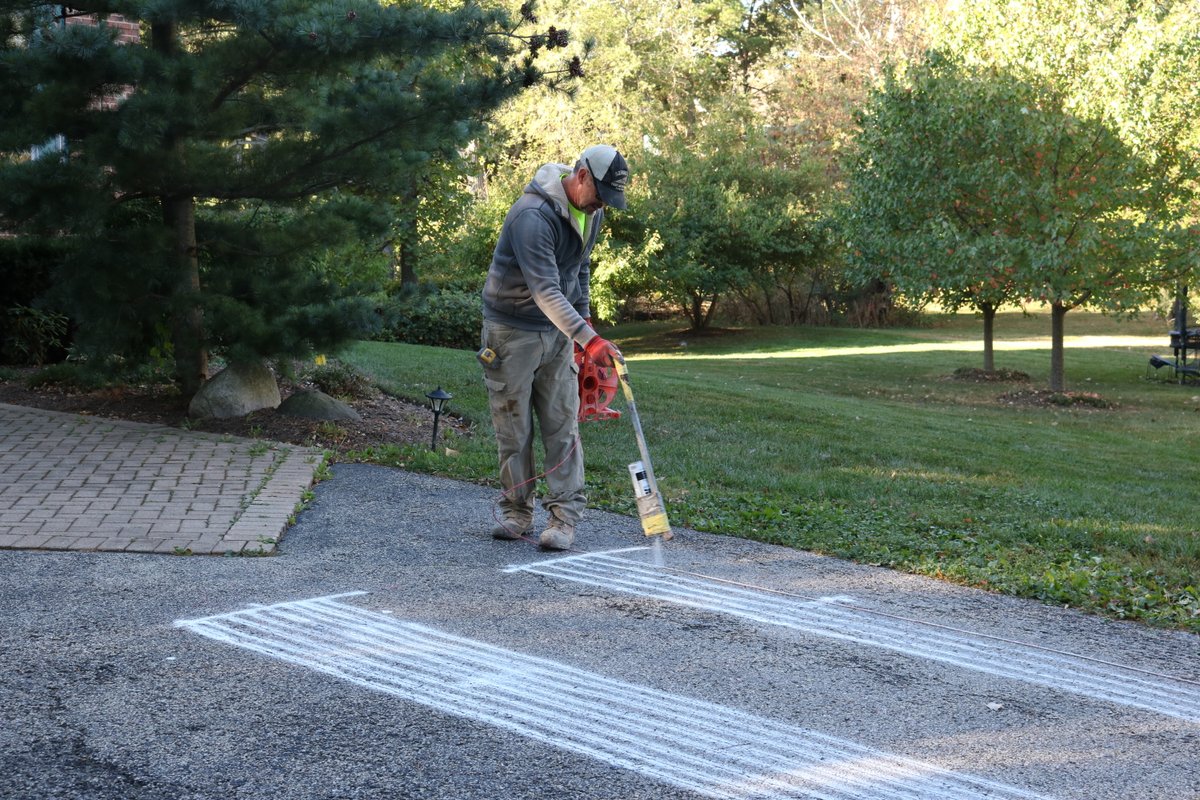
Pro Tip: While the chalk marking string is on the surface, spray the spray paint over the string to mark the position of the saw cuts. That will prevent the line from washing away and will provide a clear identification to ensure evenly-spaced and straight cuts.
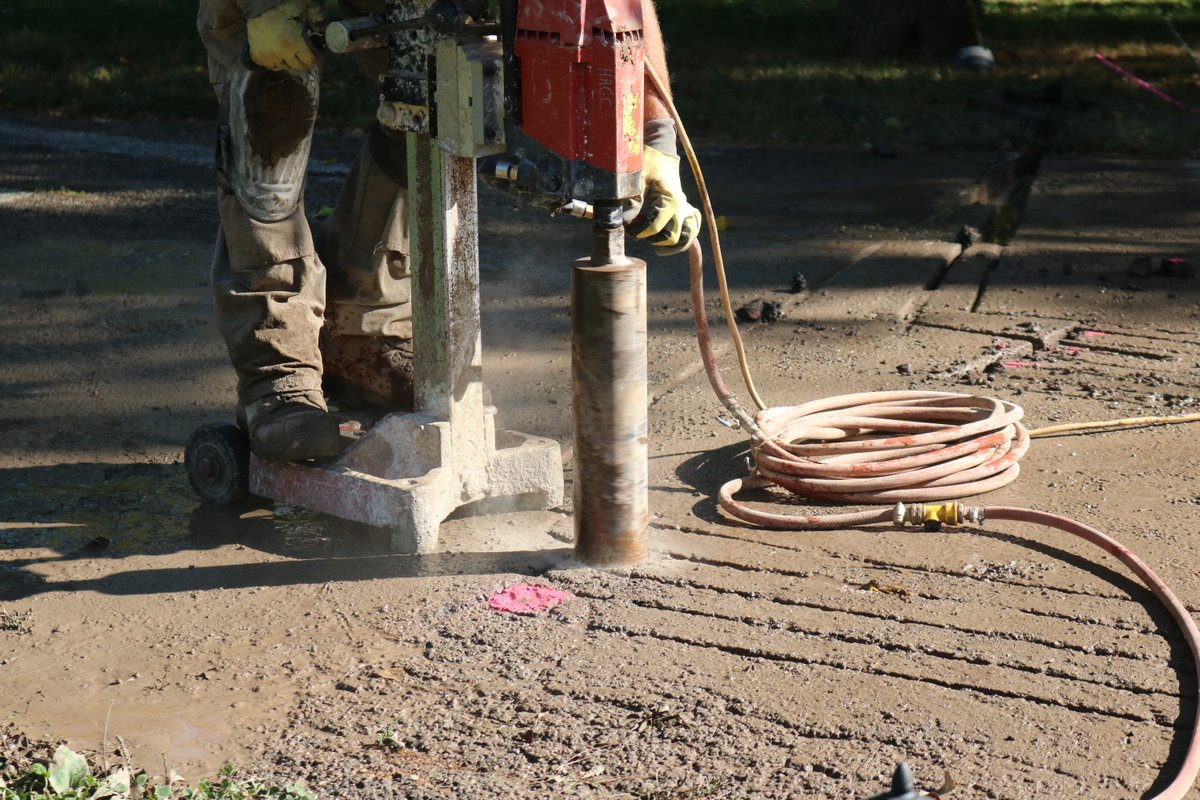
Step 2. Preparing for Junction Box
Depending on the size and location of your project, it may require the use of one or more junction boxes.
By reviewing your WarmlyYours SmartPlan, your electrician will be able to identify where the junction boxes for your snow melting system should be located. Make sure to mark and cut additional lines to exit points for the non-heating leads in the concrete slab or asphalt.
Please note that the cold leads of the heating cables must be protected by approved conduit as they exit the driveway and travel to the junction boxes.
The junction box serves as an intermediary connection location between the heating element itself and the snow melting relay panel or control that you select. Making sure to establish the location of the junction boxes early on will allow you to make sure that all sequential steps are going according to plan.
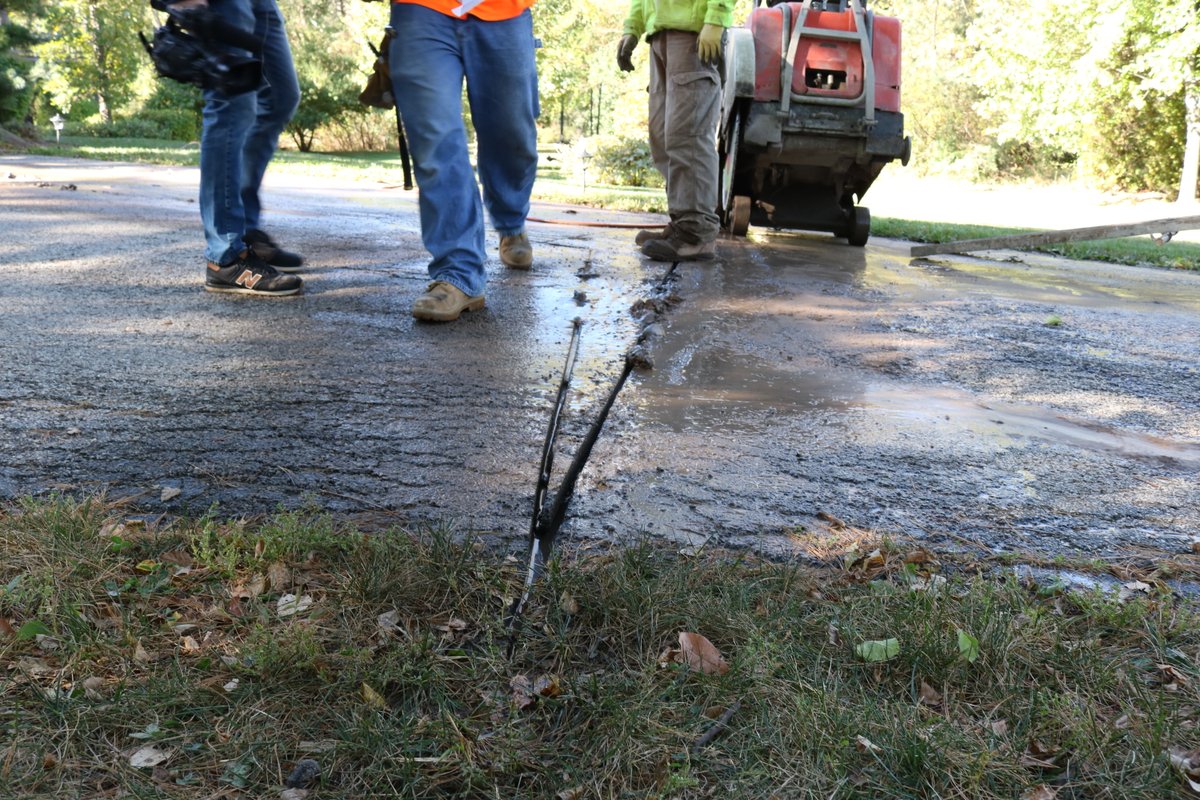
Step 3. Making Room for Snow Melting Cables
Preferred Method: Saw Cutting Main Lines

Saw cut each line to achieve at least a ⅜” wide groove to fit a snow melting cable in. Multiple blades may need to be used to accomplish a wider cut. Test with a shorter cut first and use a cable to see if it fits in. Cuts need to be at least 1-½” deep, per National Electrical Code, and the cable should not run deeper than 2-3” from the surface to ensure proper performance. Plan a wider cut of about 9/16” or more for the 6” long factory splices at the beginning and end of the cable. Ensure the splice can be fully buried and placed at least 4” from the conduit opening. It may be a good idea to make the last run 5’-10’ longer than needed to allow for any cable overruns.
If an in-slab high temperature limit sensor will be used, this is the best time to plan one short groove equally spaced between two heating cables. Separate conduit should be used to protect the low voltage sensor wire and it must NOT be shared with any high voltage cold lead from the heating cable. The temperature sensor conduit should be capped off and the sensor itself installed within the conduit near the cap. This allows easy replacement of the sensor if required.
Alternative Method for Tire Track Format: Removing Trenches
If you're installing a snow melting system for tire track coverage during a retrofit installation, an alternative trenching method may be used. Remove 2-3” of the top asphalt layer that matches the length and width of the the snow melt mats being used. Unroll the mats within the trenches and lay asphalt on top. Each trench needs to be at least 1.5” deep, per National Electrical Code, and the mat should not run deeper than 2-3” from the surface to ensure proper performance. Plan a cut about 9/16” wide or more for the 6” long factory splice at the beginning of the mat. Ensure the splice will be fully buried and is placed at least 4” from the conduit opening.
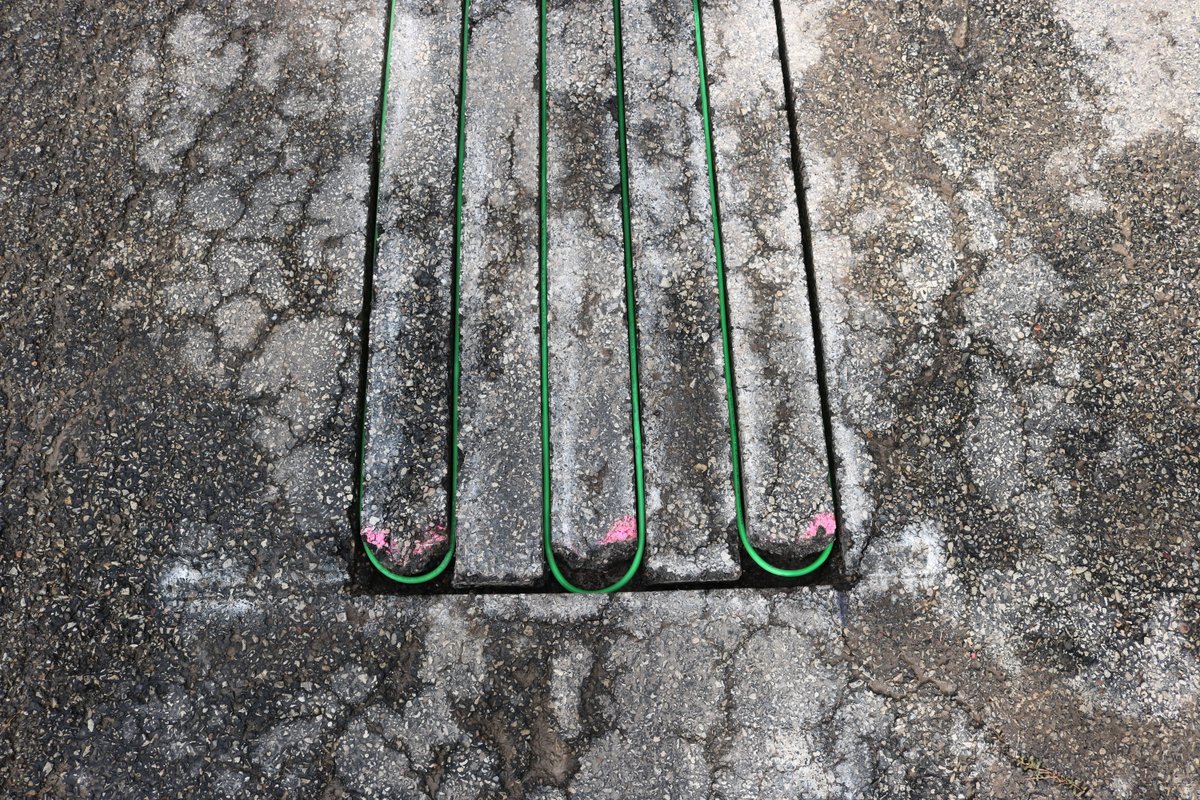
Step 4. Saw Cutting U-turns
Round the corners of cuts to allow smooth cable placing in the U-turns. This can be accomplished by making additional 45° cuts at the U-turns or doing a core drilling with a core drill bit with a diameter matching the cable spacing (typically 3”). Please note that core drilling will require much more filler than the saw cut method will.
Remove any sharp edges to avoid cable damage and clean the grooves with a high-power pressure washer. Allow to dry and ensure that the grooves are free of dust and debris.
Step 5. Test your System at Every Stage of Installation
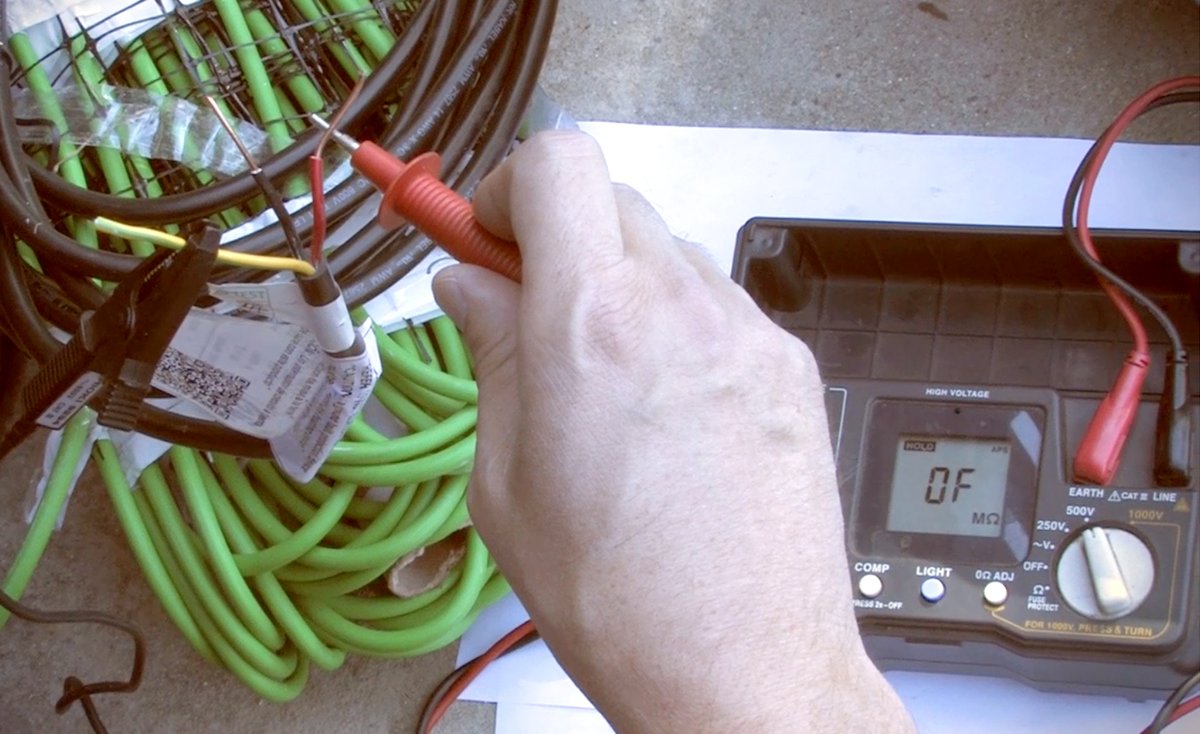
Testing your snow melting system with an ohmmeter and megohmmeter at every stage of installation will allow you to be certain that the heating element is functioning properly.
Completing these tests, and recording your readings accurately, will also qualify your project for WarmlyYours' 10-year warranty.
Make sure to consult your WarmlyYours snow melting installation manual for more information.
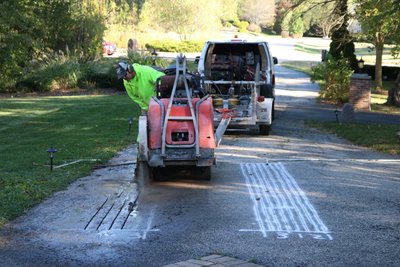
Step 6. Laying Out Snow Melting Cables
Install the conduit into the drive and run the leads into it and on into the junction box. Verify that factory splice will be 4” away from the conduit when installed, and start installing the cable into the grooves. Verify the length of cable used in the first run of grooves. If more cable was used than planned, coverage at the end will be reduced. If less cable was used, you may have too much cable for the last run. This is why we suggest an extra long groove cut for the last run, so that it will accommodate any extra cable. It is easier to make an extra cut while the cutter is there than it is to get the contractor back out to make additional cuts afterwards.
Do not try to pull on the cable to slide it through the grooves. Do not compress or strain the cable, run heavy machinery, equipment, or vehicles over it. Any of these actions could damage the cable
Step 7. Make Sure the Manufacturer’s Splice is Embedded

In this project, two separate heating cables (one in each tire track) are set up so that they 'begin' on the same side. This allows for one junction box to carry power to the cables.
Power is carried to each mat by a non-heating 'cold lead', which is connected to the heating cable via a manufacturer's splice.
One of the most common snow melting installation mistakes that people make is leaving this splice, and some of the heating cable, outside of the asphalt (sometimes people leave it in the conduit or simply leave it exposed). This can cause the splice, which is half heating element, to overheat and fail. By simply making sure that the splice is embedded correctly in the asphalt, you'll help ensure a problem-free installation.
Be careful to avoid stepping on or applying pressure to the factory splice or endcap.
Step 8. Filling The Grooves

Fill all cuts with hot asphaltic sealer for asphalt retrofits, or expansion joint sealer (SikaFlex or similar) for concrete retrofits. Make sure this step is done in accordance with the filler manufacturer’s recommended procedures.
A top seal-coat is not necessary, though it can be applied for esthetic reasons.
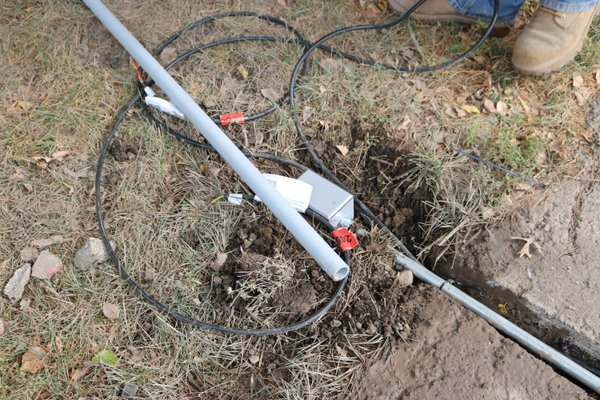
The Junction Box
In the photo, you can see the conduits which will ultimately be attached to the junction box. There is a conduit for each cable that will contain the cold lead and another conduit for the temperature sensor (if required by the controller). The sensor measures how warm the heated asphalt gets and is a crucial component for a well-functioning snow melting system.
The pictured junction box is surface-mounted. No matter if the junction box is elevated or ground level, the most important thing is that the junction box remains accessible.

The Control for Your Snow Melting System
WarmlyYours offers a wide variety of controls for our snow melting systems - from a manual option with a timer that will only activate when you turn it on/off, to an automatic option that will turn on when it senses snow is falling.
These controls (excluding the manual and WiFi options) are able to function with the use of sensors. There are two main types of sensors: slab and aerial. Slab sensors are installed along with the heating element (but never touching it) and they can measure the conditions at the surface (slab sensors are not recommended for use with pavers). Aerial sensors are installed in the open and are actually able to detect whether or not it’s snowing.
For more information about the variety of snow melt controls and sensors available from WarmlyYours, check out this comparison chart.
Shop Controls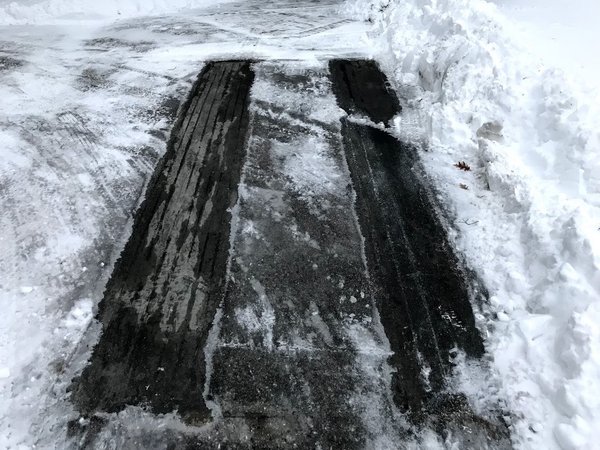
The Finished Driveway
Once the driveway is completed, it's ready to be used. Just add snow! Make sure to monitor your driveway system and control throughout the first couple of snowfalls to see if any adjustments are required.
As you can see, this snow melting system in the “tire track” format will keep your driveway usable, even in the dead of winter.
In this photo, you may notice that the heated area is partially dry with a few wet sections. Most WarmlyYours snow melting systems will continue to run for a pre-determined “after-run” time after the snow stops falling. This will typically evaporate the water left behind, and in its place, you'll find clean, dry asphalt.
Snow melting systems like this allow you to do away with chemical melting agents, which will be easier on your pets and your vehicles. It will also be much easier on your body when you can officially retire the snow shovel.
Shop Snow MeltingFrequently Asked Questions
Can this be used with pavers?
Pavers can be removed and reinstalled for a retrofit application of our snow melt system. Tire tracks are not typically recommended for paver surfaces, so any retrofit application would most likely need to be full coverage. In this case, it should be treated like a brand new installation, just with existing pavers.
Does it affect life of the existing driveway?
This type of installation should not significantly affect the longevity of the driveway. Be sure to have a professional for your surface material type evaluate this during installation.
Get Your Snow Melting Project Started Now!
Get an Instant Quote to find out how much snow melting will cost.
Free, no-obligation SmartPlan that includes an installation plan, an electrical plan, and an itemized quote.
Find out the estimated operating cost for your system.