Snow Melting for Heated Walkways & Path


When snow and ice accumulate on outdoor walkways and paths, it can create hazardous conditions and impede access. At WarmlyYours, we offer state-of-the-art solutions for efficiently melting snow on outdoor surfaces with radiant heating.

Our innovative snow melting systems use electric heating cables and mats installed under the surface to gently melt snow as it falls. This keeps walkways, patios, and paths clear for safe outdoor access throughout the winter.

Snow melting systems from WarmlyYours feature self-regulating and constant wattage heating cables that are durable and efficient. With customized design assistance from our snow melting specialists, we create systems tailored to the unique layouts and climate challenges of your property.

Follow our detailed guide and learn how to install a snow melting system for walkways and paths for efficient heating.


Get an Instant Quote

Operating Cost Calculator

noun_floor plan_2158348
Project Showcase

Contact a Radiant Heating Expert


What is Snow Melting?

Have you ever seen snow fall on an already warm car? It melts instantly. This is the essential idea behind snow melting systems—a heating element is embedded in your driveway (or patio, walkway, etc.) and it melts the snow that falls on it.

Like any outdoor surface, walkways or pathways can benefit from installing a WarmlyYours snow melting system (available in both heating mats and cables). Designed to install directly in concrete, asphalt, or in mortar beneath pavers, our cable snow melting systems ensure that driveways, patios, walkways, ramps, or stairs stay ice and snow free, allowing for safe passage.

Learn More About Snow Melting

Free Quote and Installation Plan From Our Engineers

Perhaps the most important stage in installing a snow melting system is getting a good installation plan.

WarmlyYours provides a free, no-obligation SmartPlan that includes an installation plan, an electrical plan, and an itemized quote, all of which is prepared by a highly skilled team of engineers.

All you have to do to take advantage of this service is to provide WarmlyYours with a sketch of the project that includes dimensions and other relevant information, like where power will be most readily accessible.

Within typically one day of providing this information, you'll receive your free SmartPlan. The itemized quote included in your SmartPlan will also include MSRP pricing so that you can properly budget for your project.

Request a Free SmartPlan

When to Install a Snow Melting System in a Walkway

Because the snow melting system is embedded within the surface itself, the best time to install a snow melting system is when a walkway or path is either being created for the first time, redone, or expanded.

These kinds of projects are typically undertaken from late spring to late fall. This is because it’s important that the ground temperature is above the freezing point.

The example pictured is of a walkway improvement that will double as an accessibility ramp. This walkway, with a very gradual slope, is leading to a detached garage behind the house for wheelchair accessible van, however, the installation process would be very similar for comparable projects like a front walkway. This project is using electric snow melting cables embedded in sand beneath pavers.

By adding the snow melting system, the customer is sure to have a clean path to the garage without having to rely on a snow removal service. Because this snow melting system is electric, it can easily be expanded in the future if these homeowners decide to add to the square footage of the walkway or install a heated driveway.

Snow Melt Walkway After
Snow Melt Walkway Before

Move Slider to View Before and After


Installing the Snow Melting System

The thinness of an electrical snow melting system means it has a minimal impact on the overall depth of the walkway or ramp. These snow melting systems can be used not only with concrete, but also with a variety of different surface types, like pavers and asphalt.

Each surface type will have a different cross section with suggested depths.

Step 1. Laying Down a Rebar Frame or Wire Mesh

Laying Down a Rebar Frame or Wire Mesh

For snow melting cables, like the ones used in the projects featured in this guide, it’s important to include a rigid framework for the heating elements to attach to. This ensures the heating system will maintain the proper spacing and depth in the finished project to function properly.

Often, installers will use a rebar frame or wire mesh that is secured so that it lies flat. Then the cables can be attached to the framework with zip-ties.

Step 2. Start Laying Out Snow Melting Cables

If you want optimal results from a snow melting system, maintaining the proper spacing of the heating elements is key. The heating cable or mats should be attached to the framework using ties to maintain proper depth and spacing, 3” (76mm) for free-form type cable.

Snow melting mats already have the desired 3” spacing built into them, but care should be taken to make sure parallel runs of snow melting mats are still spaced so that cables are 3” apart.

Reference the WarmlyYours custom SmartPlan installation plan, provided free with every quote, so that this process goes smoothly.

Step 3. Preparation for Handrails (if Applicable)

Preparation for Handrails (if Applicable)

For installations in stairs, ramps and walkways that will include handrails, it is strongly recommended that the installer put in pre-sleeves for the posts to avoid as much drilling of the surface as possible.

The heating cable must be routed around these sleeves or posts to avoid any direct contact with them. It is the responsibility of the electrician and the installer to coordinate their efforts so they avoid saw-cutting or drilling through heating cables that are no longer visible beneath the surface.

Note: Avoid allowing the heating cable, or metal framework, from making direct contact with the posts or any other metal fixtures.

Step 4. Installing the Surface for the Heated Walkway

Pouring Concrete for a Heated Pathway

Pouring Concrete for a Heated Pathway

Concrete or cement installs can be done in two different ways: 1-stage pours or 2-stage pours.

For 2-stage pours, the installer will pour an initial base layer of concrete and then, while the first layer is still wet, lay the framework (with attached heating element) on top. Then, the second 2-3” layer of concrete can be applied

For 1-stage pours, the framework (with attached heating element) must be propped up so that the heating element will be 2-3” below the finished surface. Once that is done, the concrete can be poured on, around, and over the framework.

See the WarmlyYours snow melting installation manual for more info.


Installing Pavers for the Walkway

Installing Pavers for the Walkway

Care must be taken by the paver installer so the mortar (or other medium) covers the heating element so that no direct contact with the pavers is made.

We recommend that at least 1” (25mm) thick mortar is poured over the heating element, but no more than 1.5” (38mm). If using sand or limestone screenings, cover to an uncompacted depth of 1.5” (38mm), leveled to grade. Avoid dropping pavers into place, as doing so may damage the heating element.

Brick or stone pavers must NOT be any thicker than 2.5” (63.5mm).

Please note that snow melting mat pictured will be completely covered before the pavers are finally placed.

Step 5. Making Sure the Manufacturer’s Splice is Embedded in Concrete, Mortar, or Sand

Making Sure the Manufacturer’s Splice is Embedded in Concrete, Mortar, or Sand

The power is carried to each cable by a “cold lead,” which is connected to the heating cable via a manufacturer’s splice.

One of the most common snow melting installation mistakes that people make is leaving this splice, and some of the heating cable, outside of the concrete or sand (sometimes people leave it in the conduit or simply leave it exposed). This can cause the splice, which is half heating element, to overheat and fail.

By simply making sure that the splice is embedded, you’ll ensure that it has an appropriate medium (like concrete, sand, or stone dust) to prevent overheating.


A Finished Walkway (Pavers)

Once the stairs are completed, they are ready to be used. Just add snow!

Make sure to monitor your system and control throughout the first couple of snowfalls to see if any adjustments are required.


The Control for Your Snow Melting System

WarmlyYours offers a wide variety of controls for our snow melting systems - from a manual option with a timer that will only activate when you turn it on/off, to an automatic option that will turn on when it senses snow is falling.

These controls (excluding the manual and WiFi options) are able to function with the use of sensors. There are two main types of sensors: slab and aerial. Slab sensors are installed along with the heating element (but never touching it) and they can measure the conditions at the surface (slab sensors are not recommended for use with pavers). Aerial sensors are installed in the open and are actually able to detect whether or not it’s snowing.

For more information about the variety of snow melt controls and sensors available from WarmlyYours, check out this comparison chart.

Shop Controls


Snow Melting System in Action

Most WarmlyYours snow melting systems will continue to run past when the snow stops falling. This will typically evaporate the water left behind, and in its place, you’ll find clean, dry pavers or concrete. Snow melting systems like this allow you to do away with chemical melting agents, which will be easier on your pets and your vehicles. It will also be much easier on your body when you can officially retire the snow shovel.

showing a snow melting system in "tire tracks" format melting snow in a residential driveway. Typically, a snow melting system would be installed in a walkway to provide full coverage.

Shop Snow Melting

Compare Snow Melting System Costs

Heated Paver Walkway

Size 214 sq. ft.
Coverage Full Coverage

Snow Melting Cables (2)

Value Snow Melt Control

Relay Panel Small

Snow Melt Plaque
Total
$2,549
$0.80 1 Hour
240 VAC
10,016 Watts
41.8 Amps

Heated Concrete Walkway

Size 437 sq. ft.
Coverage Full Coverage

Economy Snow Melt Control

Economy Snow Melt Control

Relay Panel Large

Snow Melt Plaque
Total
$5,184
$1.64 1 Hour
240 VAC
20,524 Watts
85.53 Amps

*All pricing information is MSRP and is subject to change. Operating cost calculation is based on the national average of $0.15 per kWh, but consumption may vary based on individual conditions.


Heated Walkway & Path Frequently Asked Questions

How quickly do these systems melt the snow?

That depends on a number of variables (like the temperature outside) but generally speaking these snow melting systems are designed to melt 1" - 3" of snow per hour. Anything above 3" per hour is typically considered blizzard conditions. 

18 people found this helpful.  Did you find this helpful? Yes No

Is it okay to cut the snow melting cable if it is too long for the application for which it was designed?

Never cut the heating cable. A heating cable will not work if it has been cut. If the heating cable is too long, call WarmlyYours to consult with a technician who will guide you in utilizing the additional length of cable.

16 people found this helpful.  Did you find this helpful? Yes No

How does the electric snow melting system compare to hot water tubing (hydronic) systems?

The material costs are similar. However, electric systems are easier to install, with fewer components and significantly lower maintenance costs. Electric systems will run for a shorter period of time to give the same level of performance but with much higher energy efficiency (typically 95%-98% efficient). Controls and sensors required for the two types of systems are very similar. Electric systems do not usually require slab insulation and do not create the concerns typically associated with hydronic systems. These concerns include, but are not limited to, return temperatures, flue gas venting, waterway shrinkage and property damage caused by leaking pipes or tubes.

13 people found this helpful.  Did you find this helpful? Yes No

May I cross or overlap the WarmlyYours snow melt heating cable?

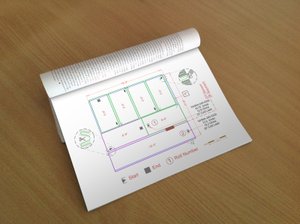
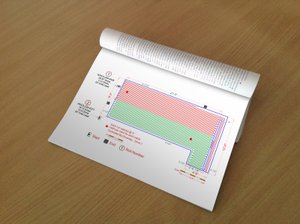
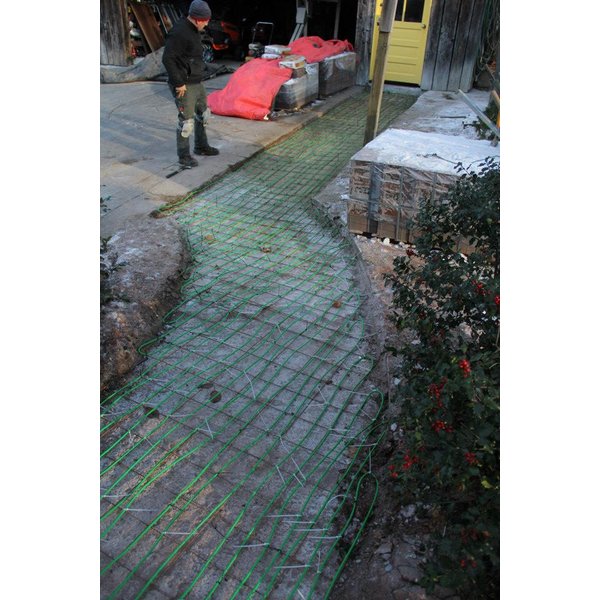
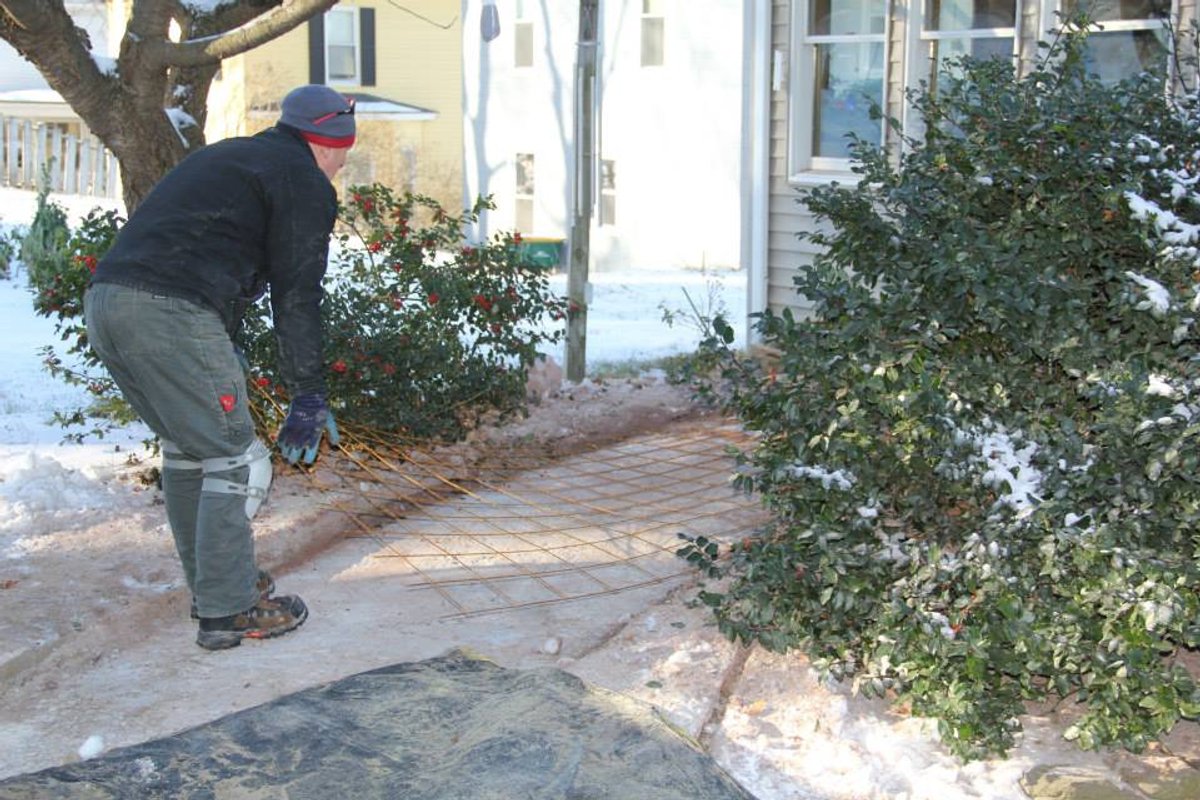
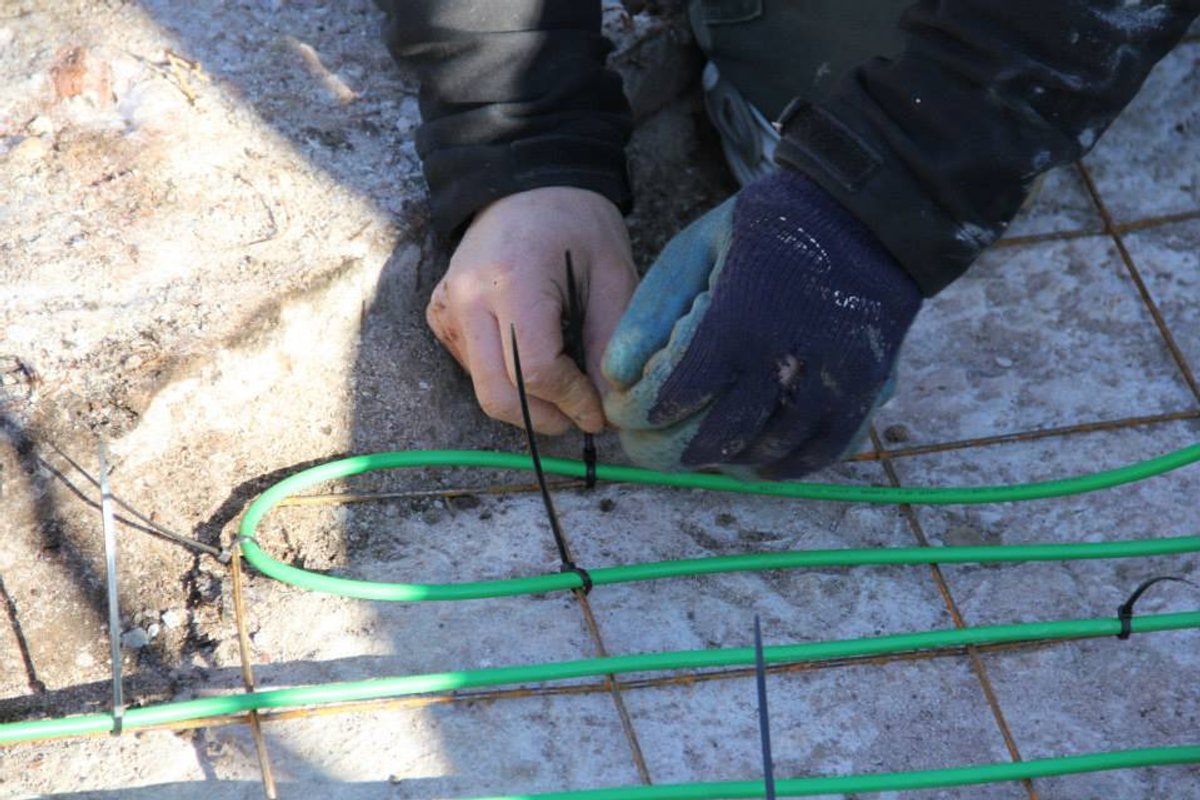
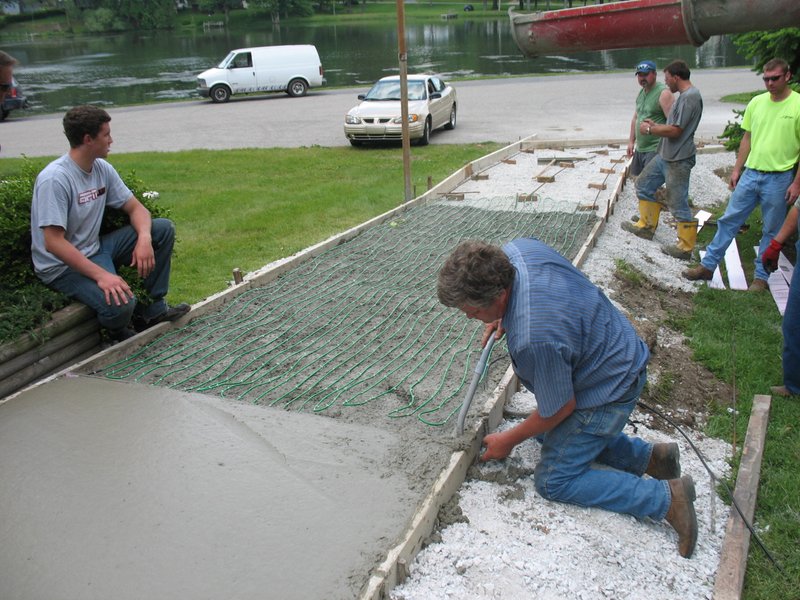
When installing outdoor WarmlyYours snow melting cables for your driveway, patio, walkway, terrace, stairs, ramp, etc. - NEVER cross, overlap, or allow the heating cables to touch each other. Doing so will quickly cause a circuit failure due to excessive heat build up. Always follow the installation instructions and/or design layout plan to ensure the cable is installed with the correct spacing required for proper operation.

13 people found this helpful.  Did you find this helpful? Yes No

Does the factory splice need to be completely embedded during installation?

Yes. The manufacturer's splice that connects the heating element to the cold lead should be entirely embedded in a noncombustible material (like asphalt, concrete, or mortar) within the outdoor surface that is being heated. 

11 people found this helpful.  Did you find this helpful? Yes No

What is the lowest temperature that a snow melt system can handle?

Our systems can handle low temperatures, but many controls come equipped with a Low-Temperature Lockout Feature. This feature prevents the system from running in very low temperatures. At very low temperatures it can become difficult for the system to effectively melt the snow. It is however possible to turn off this feature should you need the system to keep running during such low temperatures.

10 people found this helpful.  Did you find this helpful? Yes No

How much power does the snow melting system use?

Power requirements are measured in Amps and based on three factors: the watts per sq. ft. of the snow melting cable or mat, the area powered and the voltage used for the application. Our product is rated at 50 watts per sq. ft., so that is a constant factor. Most snowmelt projects are powered with 240V AC – not all, but most. The one factor that is always variable is the area to be heated/powered. That is based on your project. For a point of reference, let’s use the example above of a 350 sq. ft. concrete patio.

The formula is (50 W/sq. ft. x area of 350 sq. ft.) / V (240V) = Amps, so 17,500 / 240V = 72.9 Amps

7 people found this helpful.  Did you find this helpful? Yes No

Why a GFEP breaker and not a GFCI breaker for WarmlyYours outdoor deicing and snow melting systems?

This National Electric Code (NEC) required protection for fixed outdoor deicing and snow-melting equipment may be accomplished by using circuit breakers equipped with ground-fault equipment protection (GFEP) of 30 mA. It is important to understand that this required equipment protection is not the same as a 5 mA GFCI used for personal protection.

7 people found this helpful.  Did you find this helpful? Yes No

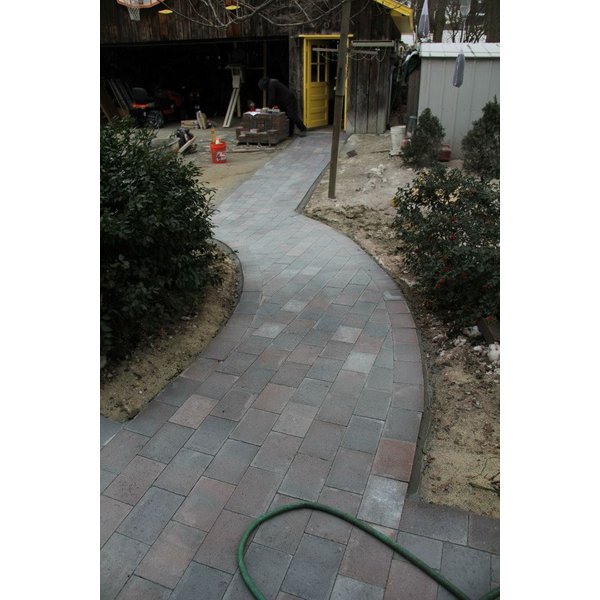
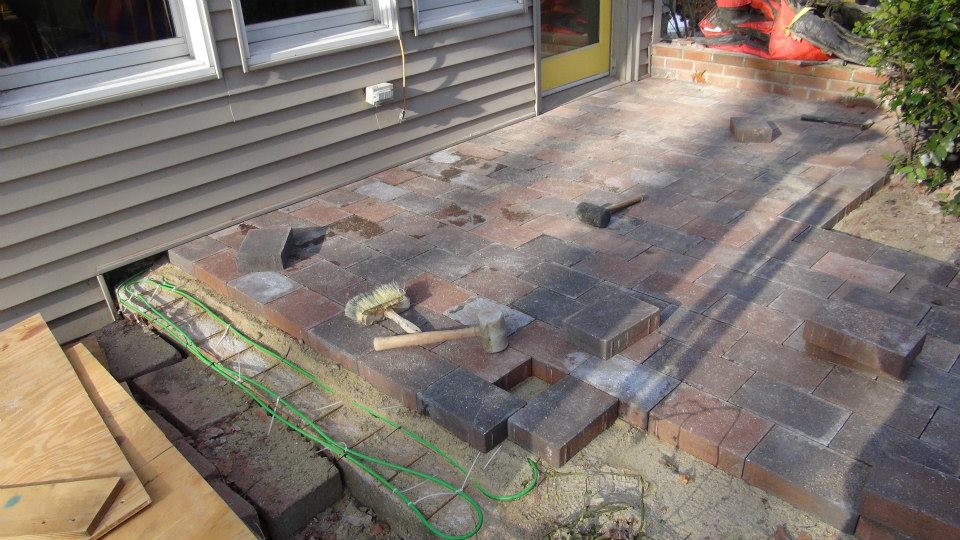
Can this be used with pavers?

Pavers can be removed and reinstalled for a retrofit application of our snow melt system. Tire tracks are not typically recommended for paver surfaces, so any retrofit application would most likely need to be full coverage. In this case, it should be treated like a brand new installation, just with existing pavers.

5 people found this helpful.  Did you find this helpful? Yes No

How much does a snow melting system cost?

The heating elements for a snow melting system typically will start at $9 ($11 CAD) per sq. ft. for Snow Melting Cables and $11 ($14 CAD) per sq. ft. for Snow Melting Mats. However, you'll also want to keep in mind the cost of a control, and if required, sensor/s for your snow melting system, which will add to the cost. Use our free Quote Builder to get an idea of how much a system would cost for your project. 

5 people found this helpful.  Did you find this helpful? Yes No

Will the snow refreeze into ice once melted?

All of our automatic controllers have a Hold-on time feature after the initial warming up of the snow melt system. This feature ensures that all the snow is melted from the surface, and also that the system continues to operate and evaporate the surface water without it refreezing.

4 people found this helpful.  Did you find this helpful? Yes No

Does it affect life of the existing driveway?

This type of installation should not significantly affect the longevity of the driveway. Be sure to have a professional for your surface material type evaluate this during installation.

4 people found this helpful.  Did you find this helpful? Yes No

When do I need a relay panel?

When the design requirement's amp draw exceeds the selected controller's capacity.

3 people found this helpful.  Did you find this helpful? Yes No

How deep should snow melting heating elements be embedded in an outdoor surface like a driveway or walkway?

To ensure optimal performance, snow melting heating elements should be installed so that they are consistently 2"-3" from the finished surface. For installations using pavers, the maximum thickness for pavers installed over heating elements is 2.5". 

3 people found this helpful.  Did you find this helpful? Yes No

What is the wire spacing for snow melt cables?

3“ from wire to wire

2 people found this helpful.  Did you find this helpful? Yes No

Where does the aerial sensor get placed?

In an area free of obstruction and able to detect rain or snow, yet low enough so that it is easily accessible if service is needed. Atop a fence post or on an 'L' bracket on the side of a building are common.

2 people found this helpful.  Did you find this helpful? Yes No

How much does the snow melting system cost to operate?

To calculate the system's approximate operating costs, multiply the total kilowatts of the system by the cost per kilowatt in your area. Let's use the example of a 350 sq. ft. of concrete patio (residential application), with 240 VAC.

Total Watts: multiply area in sq. ft. x 50 Watts
350 x 50 = 17,500 Total Watts

Kilowatts: (the unit in we purchase electricity) take the Total Watts and divide by 1000
17,500 Total Watts / 1000 = 17.5 Kilowatts.

Kilowatt Rate: use the national average of .12 cents per Kilowatt-hours so how much do we pay for 17.5 kWatts?
17.5 kW x .10 = $1.75 for every full hour of operation.

Hours of Operation: We use a typical 6 hour snowfall for our example.
$1.75 x 6 hours = $10.50 for that snowfall.

All of this will vary due to "after-run time". "After run time" is where the system remains on extra hours after the snow has completed falling, to ensure complete pavement snow melting and drying.

2 people found this helpful.  Did you find this helpful? Yes No

What happens if the snow melt cable is damaged during the installation?

If a cable is damaged during installation, recheck the system for continuity and confirm the integrity of the insulation with a megohmmeter, or "megger" tester, referring to the installation and testing instructions. If the cable fails any of these tests, take the following actions: clear a 3 foot square working area around the damaged section of cable, and record the cable part number from the UL tag and the location where you purchased the product. Call WarmlyYours with the above information. WarmlyYours will provide further assistance and supply a splice kit suitable for repairing the particular cable.

2 people found this helpful.  Did you find this helpful? Yes No

Do you need a thermostat for the Snow Melting system?

The snow melting system is not operated by a thermostat, it is operated by either an automatic or manual controller.  A snow melting controller does not maintain temperatures like an indoor thermostat does.  An automatic snow melting controller only turns the snow melting system on when it detects precipitation and the temperature outdoors is below the set temp (typically 37.4°F / 3°C).

1 person found this helpful.  Did you find this helpful? Yes No

At what depth do the snow melt cables need to be?

Minimum is 1.5“ and Maximum is 2.5“

1 person found this helpful.  Did you find this helpful? Yes No

Is this product sufficient to melt the snow in our area? Also, about what will this product cost to use per day?

A properly designed and installed system will handle most snow melting demands. Some snow events may have a very rapid snow fall rate, and some may not. No 2 events are ever exactly the same. Our system typically can melt 1“-2“ of snow per hour, on average. However, it is important to understand that a system may not melt snow at very cold temperatures. This is simply because the system cannot generate enough BTUs to overcome the heat loss generated by very low temperatures.
In order to estimate cost of operation, the Warmly Yours Electric Snow Melting Operating Cost Calculator is a useful tool that can help illustrate what it would cost to operate the system.

1 person found this helpful.  Did you find this helpful? Yes No

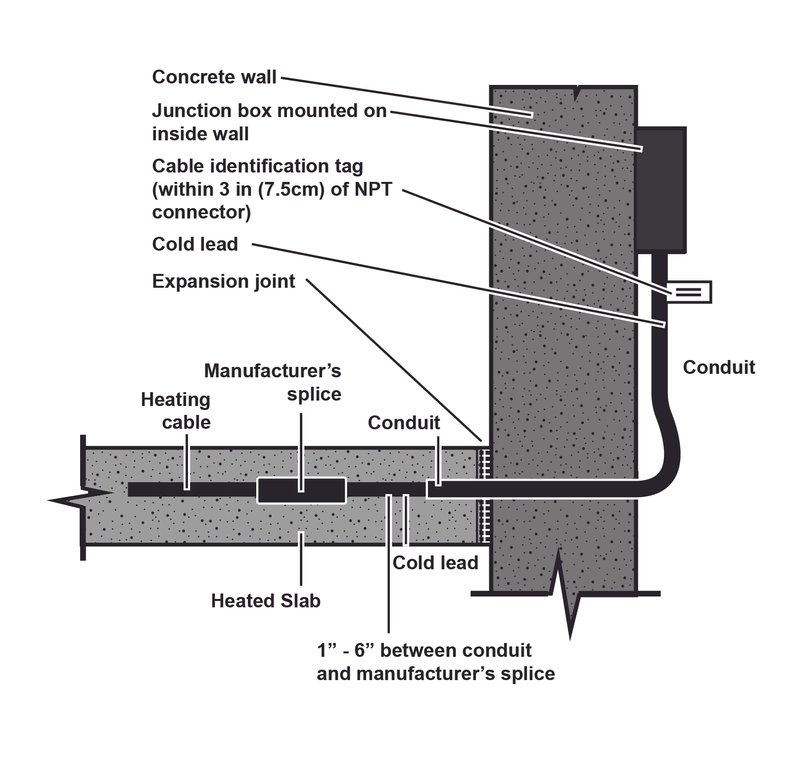
How should the Cold Lead be installed for patios/walkways/driveways?

The electrician must route the cold lead(s) through rigid metal conduit(s) or other approved means, to get back to an accessible weatherproof junction box(s). Care must be taken by the electrician so that none of the heated section of Cable enters the conduit(s).

1 person found this helpful.  Did you find this helpful? Yes No

What in addition to the snow melt mat/cable do I need from WarmlyYours for an install?

Once you've decided what type of heating system (manual vs. automatic), you'll need to choose a control, which may or may not utilize a sensor. You may need a relay panel(s) depending on the size of the system, and a snow melt plaque which is required by the National Electric Code. Junction box(es) may be optional depending on the distance of heating cable from the indoor power location.

1 person found this helpful.  Did you find this helpful? Yes No

What is the minimum depth for the layer of noncombustible material needed beneath snow melting heating elements?

The layer of noncombustible material needed below snow melting heating elements must be at least 2" deep. 

1 person found this helpful.  Did you find this helpful? Yes No

What type of conduit should I use to bring power to the heating cables?

Each heating cable comes with a factory installed cold lead wire that must be routed through the rigid metal 3/4" conduit to a outdoor rated junction box where a simple wire nut connection can be made for the electrical hook-up.

1 person found this helpful.  Did you find this helpful? Yes No

Will I need a new / expanded electrical panel for my snow melting system?

Always confirm the power requirements with the electrician. Large snow melting systems usually require a new electrical panel or electrical service. Contact WarmlyYours for a quotation, indicating the actual power capacity available, and to obtain recommendations for reducing the power consumption. For example, opting for tire track coverage rather than installing the snow melting system over the entire driveway can dramatically reduce power requirements.

1 person found this helpful.  Did you find this helpful? Yes No

What is GFEP?

Ground fault equipment protection (GFEP) is intended to provide protection for equipment against damaging line-to-ground currents by disconnecting all ungrounded conductors of the faulted circuit.

Did you find this helpful? Yes No

What is the purpose of the Low Temperature Lockout Feature on certain snow melt controllers?

This feature prevents the snow melting system from running, by default, in temperatures below 17°F (–8.33°C), or as set by the user. At temperatures this low, it becomes difficult for the system to effectively melt the snow. It is, however, possible to turn off this feature should the system be required to keep running during these low temperatures.

Did you find this helpful? Yes No

Why isn't a temperature sensor required for all installations?

It depends on how the system is intended to operate. If the expectation is manual operation (ex. WiFi or Timer Control), then no sensors are required. If the expectation is automatic operation, then the system will require at least one snow sensor.

Did you find this helpful? Yes No

Does the mat require a sensor to go with it?

No, a sensor is not required with the snow melt system. However, certain automatic controllers require a temperature/moisture sensor to sense atmospheric conditions and may also require an in-slab, high temperature limit sensor to be installed (notably, asphalt installations).

Did you find this helpful? Yes No