

If you're building a new home or getting ready to improve an existing house, it's important to think about how you will heat your house. This is especially important in temperate and colder climates, or areas with cold seasons. And we know a few important natural facts about heat:
- Hot air will always rise.
- All warm things "radiate" heat to cooler things.
- Different materials "conduct" heat differently.
You can use these facts to create a heating system for your home that works with nature to keep you comfortable while you do your part for the environment and your pocketbook.
Best practice: Consider all your options before putting pencil to paper for planning. All the elements of your home should work together toward comfort and a small footprint. Specifically, choose radiant floor heat before you choose flooring, certainly before you put down your flooring. Although you can use any kind of flooring material, tile is a natural choice for its beauty, longevity and superior heat conductivity. Let's look more closely at why you might want a heated tile floor.
Radiant Electric Floor Heat - How It Works, Why You Want It
Radiant heat is older than even the sun. Ancient cave dwellers used radiant heat when they chose caves that opened so that the daytime sun would shine onto the walls of the cave, which would collect the heat of those rays and radiate it back into the interior space at night. This practice drew on natural truths: the hot sun radiated heat to the walls of the cave, which in turn continued to radiate heat into the cooler chamber at night.
The Romans bumped it up a notch by using a skillfully engineered hypocaust system of tile and flues and artificially produced heat that circulated under the floor. Only wealthy Romans could afford these systems, which required expensive engineering skills and slaves to build and maintain the system 24 hours a day. While most Romans could not experience the benefits of a hypocaust system, any Roman could enjoy them in the public baths. And today, thanks to the incorporation of electricity into this ancient technology, homeowners can enjoy radiant flooring heat in their own homes at very affordable prices -- and they can even be used to implement DIY installations.
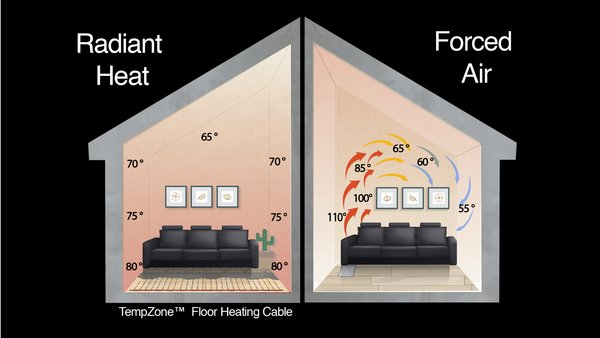
An advanced, affordable home heating system can save you money for years to come and provides many benefits over other systems like forced air, such as:
- Uses natural principles to conserve energy.
- Distributes heat evenly throughout your home.
- Will not disturb dust.
- Reduces noise levels.
- Keeps air from becoming too dry.
- Limits possible allergic reactions.
- Doesn't require regular maintenance.
Tile is the Perfect Flooring for an Electric Floor Heating System
The Romans recognized the benefits of tile when they engineered their hypocausts with heat coming from beneath the floor. That is because flooring materials with high thermal conductivity heat up more quickly and are more efficient to use with underfloor heating.
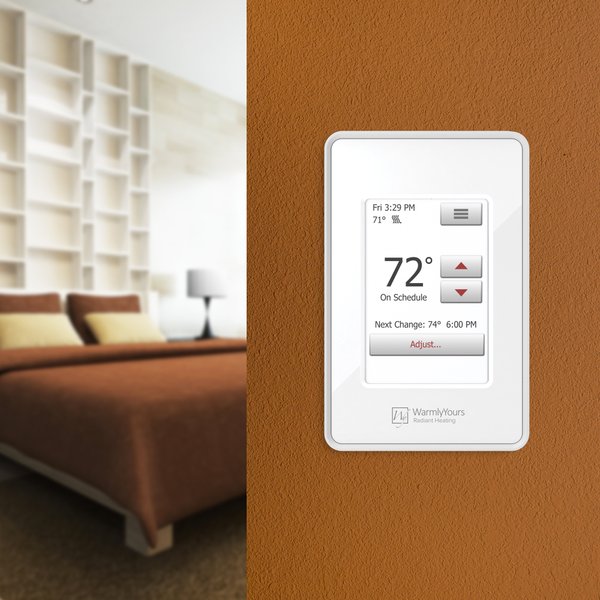
Combined with programmable thermostats that allow presetting on/off cycles to provide heat only when and where needed, a heated tile floor gives you the most energy efficient system possible, which can help you save on your monthly bill. There are also smart thermostat options available that can enable remote control of your system.
And there is another advantage to using tile in addition to beauty, longevity and superior heat conductivity! Just as tile absorbs and holds heat and releases it slowly back into a room, it also absorbs and holds cooler air during summer nights and releases it back into the room during the day. Year-'round, it reduces temperature fluctuations, and as it does that, it also reduces energy use.
Best of All, Your Tile Flooring Project Is DIY -- And Here's How
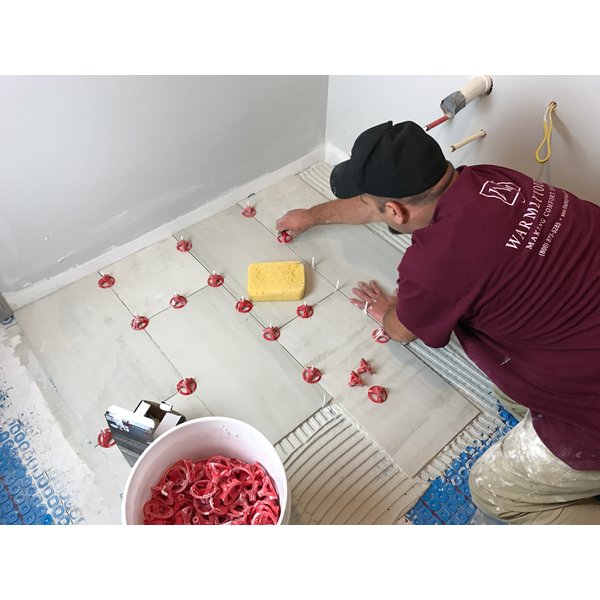
The process for installing tile is different than the method for other flooring materials like installing laminate flooring. Additionally, the process for installing a heated tile floor will also vary slightly from an unheated tile floor but luckily the floor heating system itself is designed to be easy to install. It's always a good idea to hire a contractor or professional, but if you choose to go the DIY route, you can follow the steps outlined below. Please note that even if you choose to install the system yourself, we always recommend that a licensed electrician performs the final electrical hook up.
What you will need:
- TempZone™ Flex Rolls to fit your floor plan in smaller, simpler areas (insulation kits and accessories available here).
- Tile of choice sufficient for your floor plan.
- Thinset
- Grout
- Sealer
- Trowel with flat side and notched side.
- Spacers
- Flat-edge
- Rubber mallet
- Carpenters level
- Large natural sponge
- Rubber grout float
- Tile cutter, tile saw, tile nippers, file
Prepare your subfloor:
Make sure you have a clean subfloor. Then, place your TempZone™ Flex Rolls according according to the instructions that come with your order. If you have any questions about installing floor warming at any point, do not hesitate to call our 24/7 technical support team at 1-800-875-5285.
Getting started with your tiling:
- Remove the tiles from their boxes, and randomly mix them to avoid undesirable patterns due to slight color variations between boxes.
- Find the center of your floor (the midpoint between each set of walls).
- Snap chalk lines. Where the lines cross at room center is the starting point for setting tile.
- Lay a row of tiles along a straightedge from the room center to the wall to determine the size of tiles along the wall.
- If the remaining space is less than 2", move the center tile back toward opposite wall until the measurements of remaining space at either wall are the same.
- Repeat for the perpendicular walls.
- Trim the door casings with a flush-cut saw held flat against the tile on top of a few pieces of cardboard (to simulate the depth of the thinset embedding the heating system).
Setting the tiles:
- Now you're ready to go to work! Mix the thinset to the consistency outlined in the manufacturer's instructions. Mix only what you can use in two hours, and work in areas 3' x 3'.
- Take care not to obscure your lines (or setting a straightedge along one coordinate) and spread the thinset with the flat side of your trowel in your 3' x 3' work area.
- Before the thinset dries, use the notched side of your trowel to add more in a circular motion. Then finish by moving the trowel in one straight direction across the mortar at a 45 degree angle. Return excess mortar to the bucket.
- Note: if your tile is larger than 12" x 12", it's a good idea to "back-butter" or "flat-coat" the tiles before you lay tile for best adhesion.
- Set the first tile at the intersection at the center of the room. Place tile spacers and set your next tile, moving through your work area, placing spacers as you go.
- When you complete a 3' x 3' work area, use a rubber mallet and level to make certain the tile is flat and there is no "lippage" (lippage occurs when the corner of one tile is higher than a neighboring tile -- which makes the tile difficult to clean and more susceptible to breakage).
(If necessary) Cutting the tiles:
- When you complete your whole-tile work areas, you will probably need to cut some tiles. Make these cuts before you prepare the areas for setting the cut tiles.
- Use the tile cutter for small, straight cuts.
- Use the tile saw for cutting numerous or thick tiles.
- Use the nippers for curved cuts.
- If a tile is too thick for the nippers, you can try marking the curve on a tile, then making a relief cut with the tile saw, then snapping off pieces with the tile nippers. Use your file to smooth the edges.
- Remember to cut tiles 1/4" smaller at the edge of the floor to allow for mortar and expansion.
- Apply thinset and place your tiles (with spacers where needed) in the same way.
NOTE: Allow the thinset mortar to dry for at least 24 hours before moving to the next step.
Grouting the flooring:
- Remove the tile spacers.
- Clean any thinset from the tile surface and joints.
- Mix the grout following the manufacturer's instructions until you achieve a paste-like consistency, looser than mayonnaise. Add water slowly by squeezing from a sponge.
- Note: If you have well water, use distilled water for mixing.
- Using a grout float, scoop grout on the floor, then spread it diagonally across the tiles pushing the grout into the joints between the tiles.
- Remove as much excess as possible as you work.
- Allow the grout to dry for 20 minutes or as recommended by the manufacturer.
- Use a sponge and water in a circular motion to wipe the grout from the top of the tiles and set the grout just below the tile surface.
- Complete the grout segment of your work by following up with grout haze remover to clean the tile.
Avoid heavy traffic on the floor for at least 72 hours. Wait three weeks for the grout to cure before applying grout sealer. Then apply grout sealer to the joints according to the manufacturer's instructions. Install any trimwork or transition strips. Then stand back and admire your beautiful new heated tile floor. Please note that before you turn on your heating system, you must wait for the thinset that the heating system is embedded in to fully cure.
For more details on DIY tile floors, see This Old House or the Lowe's website.
For Help Planning Your Heated Tile Floor Installation
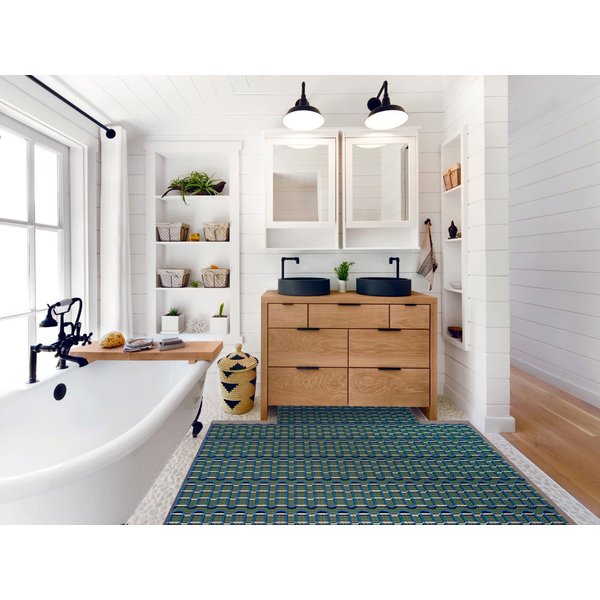
Tile can be not only economical to install but elegant, beautiful, long-lasting and, best of all, it can be part of a plan to reduce your energy consumption and your heating bill going forward.
If you would like to discuss your remodeling or home-building plans to see how heated tile flooring can work for you, please contact us. No project is too big or small to consider, and we will be happy to discuss your needs with you. See how much it would cost to add a radiant heating system to your tile project by building your own quote using our Radiant Floor Heating Quote Builder.
Give your home the heat it deserves. Be connected. Be warm. Be radiant. And top it all off with a beautiful tile floor!
Related Posts


Like this post? Subscribe for regular updates