How to Install Radiant Floor Heating under Luxury Vinyl Tile
last updated february 21, 2026


In This Article
Luxury vinyl tile (LVT) is the fastest-growing flooring category on the market — and for good reason. It's waterproof, durable, realistic-looking, and fully compatible with electric radiant floor heating. This step-by-step guide walks you through exactly how to install a TempZone® floor heating system under LVT, from subfloor prep to thermostat connection.
Want the full picture before diving in? Start with our complete LVT & radiant floor heating guide first.

Why LVT Works So Well with Radiant Floor Heating
According to Zack Zehner, Vice President of Commercial Hard Surfaces for Mannington Commercial, LVT has enjoyed strong double-digit growth even through economically challenging years. Consumers are drawn to it for its realistic designs, ease of maintenance, superior performance, water resistance, and installation flexibility.
On top of all that, LVT accommodates electric underfloor heating beautifully — as long as it's installed correctly. Follow the eight steps below to get it right.
The 8-Step Installation Guide
Step 1 — Prepare the Subfloor
Clear the subfloor of all debris. Dam off any areas — air vents, entryways, transitions — where you don't want self-leveling cement to flow. Use a marker to indicate how the heating element will be laid out per your SmartPlan® installation plan.
Installing in a Basement?
Concrete slabs have specific moisture and insulation requirements. See our Step-by-Step Basement LVT Installation Guide before you start.
Step 2 — Test the Heating Element
Using a digital ohmmeter, test the heating element and record the resistance reading — it should match the factory specification on the label. At this stage, run the cold lead from the heating element up through the thermostat box if it's already in place. Attach your Circuit Check and turn it on — it will alarm if the circuit is broken at any point during installation.
Step 3 — Install the Heating Element
Lay out the heating element according to your SmartPlan® layout and floor markings. Secure the mesh to the subfloor every 6–8 inches using hot glue, staples, or duct tape — but never staple through the heating cable itself.
Secure It Well
The heating element will naturally want to float to the top of the self-leveling cement when poured. Secure it carefully every 6–8 inches to keep it in position.
Step 4 — Place the Floor Sensor
WarmlyYours strongly recommends using a floor sensor wire when heating under LVT — it prevents the floor from ever exceeding the vinyl manufacturer's maximum temperature threshold. Place the sensor at least 6 inches into the heated area, running it parallel between the heating cables and never crossing them. Secure with hot glue.
Test Before You Bury It
Test the sensor with a digital ohmmeter before installation to confirm a good reading. Once it's under cement, you can't easily replace it.
Step 5 — Affix the Cold Leads
A 15-foot cold lead is factory pre-attached at the start of the heating element. Route it above the subfloor to the thermostat location — without crossing over the heating cable. Secure it with tape or hot glue so it doesn't shift during the cement pour. Take another ohmmeter reading to confirm no damage has occurred.
Step 6 — Embed in Self-Leveling Cement
With the Circuit Check still connected and showing green, mix and pour self-leveling cement to fully encapsulate the heating system. Apply a minimum ⅜-inch layer — enough to protect the cable and create a smooth, flat surface for the LVT above.
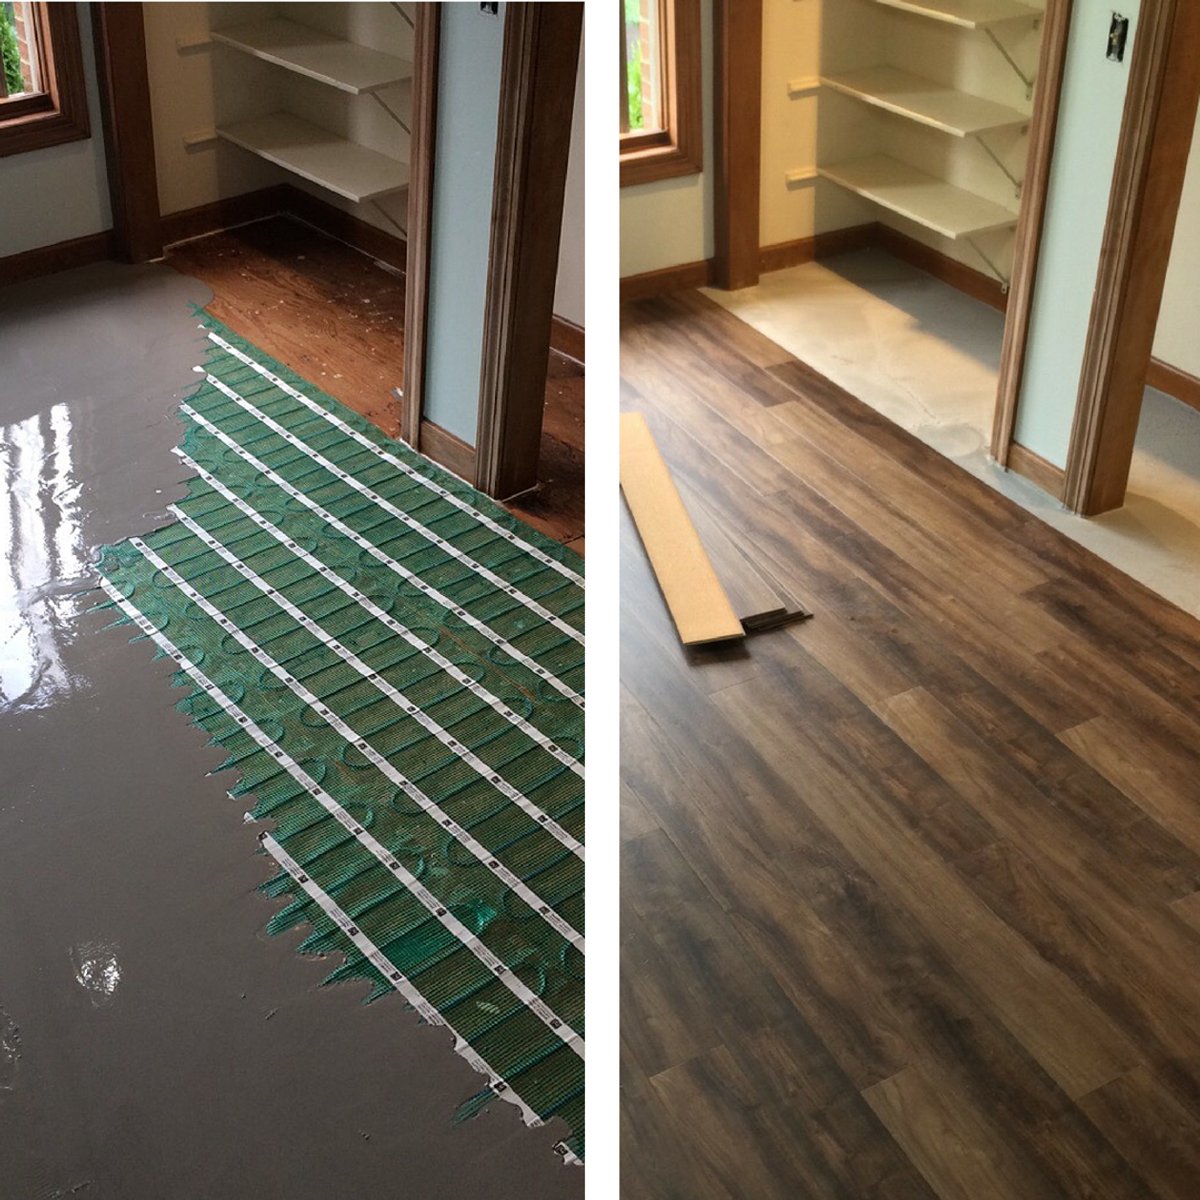
Step 7 — Install the LVT
Once the self-leveling cement has fully cured and the surface is verified flat, install the LVT per the flooring manufacturer's instructions. This may be click-lock, glue-down, or loose lay depending on the product — follow the manufacturer's method exactly.
Step 8 — Connect the Thermostat
Have a licensed electrician connect the cold lead and floor sensor to the thermostat. Set the floor temperature limit on the thermostat to the vinyl manufacturer's maximum — this ensures the sensor will cut power before the floor ever reaches a damaging temperature.
Choosing a Thermostat
Always use a thermostat with a floor sensor input when heating under LVT. Look for programmable scheduling and energy-saving modes. See all compatible options on our floor heating thermostats page →
Watch: TempZone Installation Under LVT with Self-Leveling Cement
This video walks through the full installation process — from laying the Flex Roll to pouring self-leveling cement and finishing with LVT.
Frequently Asked Questions
Can LVT be installed over radiant heating?
Yes — LVT is an excellent match for radiant floor heating. Its composition allows for efficient heat transfer and durability, making it one of the best flooring choices for heated floors.
What temperature limits should I follow?
Most LVT products have a maximum surface temperature of 80–85°F. Always follow your specific flooring manufacturer's guidelines — they vary by brand and product. Using a thermostat with a floor sensor is the best way to stay within limits automatically.
How long does LVT with radiant heating last?
With proper installation, LVT floors with radiant heating can last 20–30 years. The WarmlyYours heating system itself carries a 25-year warranty.
More LVT & Floor Heating Resources
- Luxury Vinyl Tile & Floor Heating: The Complete Guide →
- LVT vs. LVP: Which Is Right for Radiant Heat? →
- Real Project: Installing Radiant Heat Under LVT in a Basement →
Ready to Get Started?
Use the WarmlyYours Quote Builder to get an instant, personalized quote for your LVT floor heating project — or request a free SmartPlan® layout from our engineers.
Have Questions About Your Project?
Our team of Radiant Experts is ready to help!

Related Articles

Why is Everyone Remodeling? The Cause May Surprise You

The Seven Tools You Need to Install an In-Floor Heating System
")
Thinset vs. Self-Leveling when Installing Radiant Floor Heating

Answering Some of Electric Floor Heating’s Most Frequently Asked Questions (FAQs)
Stay Updated
Get the latest radiant heating news and tips delivered to your inbox.
Comments