

A new tile floor can transform an entire room — but so can the grout. Cracked, stained, or uneven grout lines instantly age the rest of the floor and draw attention to every flaw. That’s why getting the grout right is just as important as choosing the tile itself. By following these five tips, you’ll help your grout stand up to years of wear and keep your floor looking fresh.
1. Choose the right grout color from the start
If there’s one piece of expert advice a tile installer will give you, it’s this: don’t treat grout as an afterthought. The grout you choose adds color, contrast, and character to the floor, so it should be part of your design decision from day one.
- Match the tile: For a quiet, seamless look.
- Contrast with the tile: To make patterns pop.
- Go neutral: Beige or gray for flexibility and longevity.
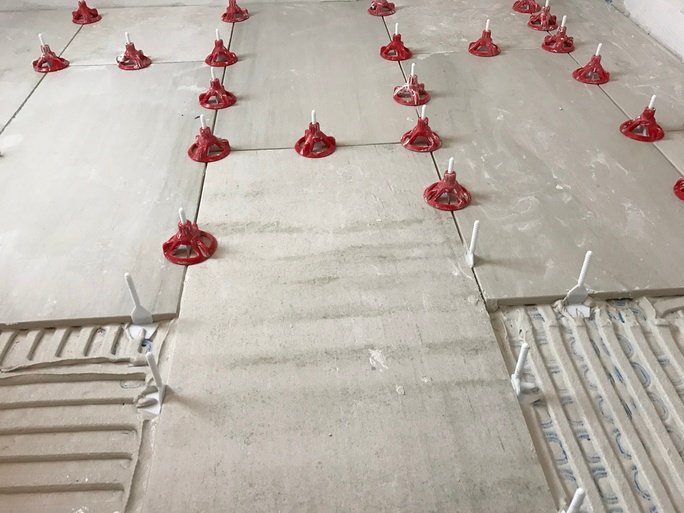
2. Use tile levelers for spacing and lippage control
Tile levelers like the Spin Doctor system act as spacers and leveling tools, ensuring consistent grout joints and a flat surface — especially important when installing over radiant floor heating.
3. Use larger grout lines to hide tile size variations
Slight size differences between tiles are inevitable. Larger grout lines help mask these irregularities and allow thinset to cure more efficiently, particularly over radiant heating.
4. Wipe away excess thinset before it hardens
Clean grout joints immediately after tile installation to avoid hardened thinset, which is difficult to remove and can damage heating cables beneath radiant floor heating systems.
5. Seal the grout to protect it from stains and wear
After curing for at least 24 hours, apply a grout sealer to repel moisture and stains. Reseal floor grout every 2–3 years to maintain a fresh look and extend grout life.
Frequently Asked Questions
What types of grout are best for different tile installations?
Cementitious grout is common for most floor and wall tiles, but epoxy grout offers superior stain resistance and durability, ideal for wet areas or high-traffic floors. Choose grout based on tile type, location, and maintenance needs.
How do I choose the right grout color for my tile floor?
Consider whether you want grout to blend with tile, create contrast, or remain neutral. Matching grout creates a seamless look, contrasting grout highlights patterns, and neutral tones offer flexibility and timeless appeal.
What is the proper grout joint thickness for various tile sizes?
Smaller tiles typically use 1/16” to 1/8” grout joints, while larger or natural stone tiles may require 1/4” or wider to accommodate size variations and allow for movement.
How long should grout cure before sealing or walking on it?
Grout generally needs 24 to 72 hours to cure fully. Avoid sealing or heavy foot traffic until the grout is completely dry to ensure proper adhesion and durability.
What are the best practices for applying grout to avoid cracking and staining?
Use a rubber float to press grout firmly into joints, clean excess promptly with a damp sponge, and avoid over-wetting. Seal grout after curing to protect against stains and moisture.
How often should grout be resealed to protect it?
Typically, grout should be resealed every 2 to 3 years, or more frequently in moisture-prone areas like bathrooms and kitchens to maintain stain resistance and durability.
Can grout be repaired or replaced without removing the tile?
Yes, damaged grout can be removed and replaced using specialized tools without disturbing the tile. This is a common maintenance task to extend floor life and appearance.
How do moisture and ventilation affect grout longevity and appearance?
Excess moisture and poor ventilation can lead to mold, mildew, and grout deterioration. Proper sealing and ensuring good airflow help maintain grout integrity and appearance.
What are common grout problems and how can they be prevented?
Common issues include cracking, staining, and discoloration. Prevent these by selecting the right grout type, applying it correctly, sealing properly, and maintaining regular cleaning and resealing.
Have Questions About Your Project?
Our team of Radiant Experts is ready to help!

Related Articles

")

Stay Updated
Get the latest radiant heating news and tips delivered to your inbox.