
Snow Melting for a Concrete Patio
Learn how to install a snow melting system for a concrete patio. Keep outdoor spaces snow- and ice-free year-round—ideal for late-season grilling and winter enjoyment.
Why Heat Your Concrete Patio?
What is Snow Melting?
If you're a home owner and you've ever wondered, "how can we reduce the freezing of snow on my patio?", then radiant snow melting systems can be of assistance to you and your loved ones.
Have you ever seen snow fall on an already warm car? It melts instantly. This is the essential idea behind snow melting systems—a heating element is embedded in your patio (or driveway, walkway, etc.) and it melts the snow that falls on it.
Like any outdoor surface, a new patio can benefit from installing a WarmlyYours snow melting system (available in both mats and cables). Designed to install directly in concrete, our systems ensure that patios stay ice and snow free.
Free SmartPlan
Get a custom installation plan for your concrete patio in just 1 business day.


"I'll design a custom snow melting layout for your project, complete with cable spacing, electrical requirements, and a full quote."


When to Install Snow Melting in a Patio
Because the snow melting system is embedded within the surface itself, the best time to install a snow melting system is when a patio or porch is either being created or during a complete patio renovation.
These kinds of projects are typically undertaken from late spring to late fall when ground temperatures are above freezing.
The snow melting heating elements must be installed within the patio itself, approximately 2-3" beneath the finished surface. This spacing ensures the optimal performance of your system.
The thinness of an electrical snow melting system (1/4" for cables and 5/16" for mats) means it has a minimal impact on the overall depth of the project.

Installing the Snow Melting System
The key to a successful snow melting system is in how it's embedded. If it's too deep, it won't effectively melt snow or ice. If it's too shallow (or exposed), it could overheat and fail.
Follow these steps for a successful concrete patio installation:
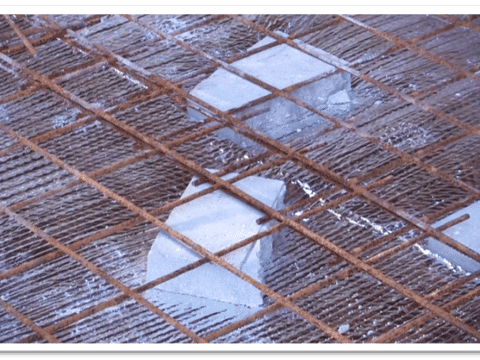


Step 1. Laying Down a Rebar Frame or Wire Mesh
To make sure your heating element is the proper 2-3" from the final surface, many installers will use a rigid framework (rebar or wire mesh) that is propped up so that the heating element is exactly where it needs to be.
Tip: For your framework, avoid using a metal mesh or frame that has sharp edges or burrs.
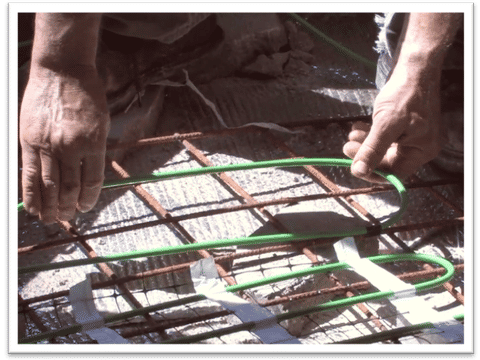
Step 2. Dry-fitting Your Snow Melting System
Once you have your framework in place at the proper depth, it's a good idea to layout your snow melting system before you're ready to attach it.
Using your WarmlyYours SmartPlan should help make this process as smooth, and as accurate, as possible.
If you identify any issues at this stage, contact us at (800) 875-5285.
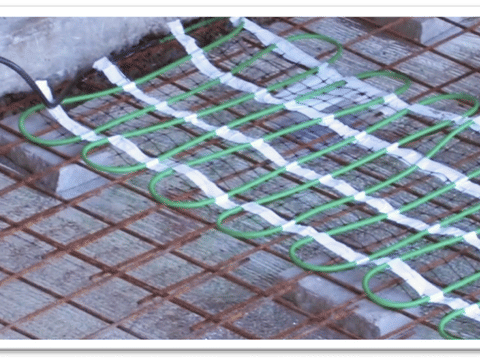
Step 3. Start Laying Out Snow Melting Mats
The snow melting mats are designed to maintain the desired 3" spacing of the heating cables.
The heating elements should be attached to the mesh using wire ties or zip-ties to maintain proper depth and spacing.
Attaching them keeps the heating element flat and prevents it from "floating" too close to the final surface when the concrete is poured.
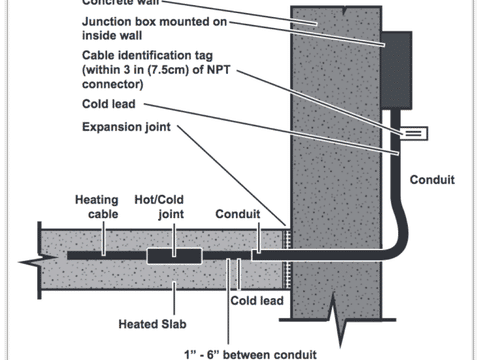
Step 4. Making Sure the Manufacturer's Splice is Embedded
The power is carried to each cable by a "cold lead," which is connected to the heating cable on the mat via a manufacturer's splice.
One of the most common installation mistakes is leaving this splice outside of the concrete. This can cause the splice to overheat and fail.
Always ensure the splice is embedded in concrete, sand, mortar, or stone dust.
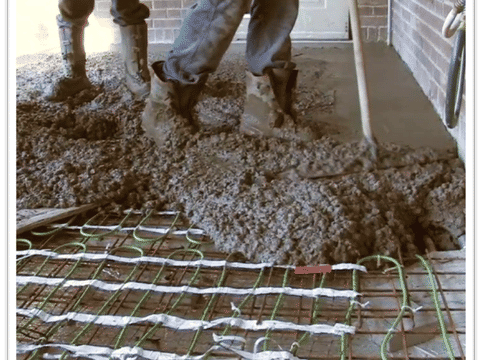
Step 5. Pouring Concrete
Concrete installs can be done in two ways: 1-stage pours or 2-stage pours.
For 2-stage pours, pour an initial base layer, then lay the framework while still wet, then apply the second 2-3" layer.
For 1-stage pours, prop up the framework and pour concrete on, around, and over it.
The Finished Heated Patio
Once the patio is completed, it's ready to be used. Just add snow! This particular patio featured a beautiful rolled faux-wood finish along with wrought-iron patio furniture and a built-in fire pit.
Just imagine how nice it will be to use your patio in the dead of winter to let your pets out, or simply enjoy a minute outside of the house.
Snow Melting Products for Concrete Patios
Both mats and cables work great for concrete patio installations. Mats offer faster installation while cables provide maximum flexibility for custom shapes.

Maximum Heat Density for Heavy Snowfall (3" spacing)
Ideal for heavy snowfall regions (60+ inches annually) or high-traffic commercial areas. The 3-inch cable spacing delivers maximum heat density (~50 watts/sq.ft) for the fastest snow melting performance. Best for: Northern climates, steep driveways, loading docks, emergency exits, and areas requiring rapid clearing.
- Maximum Heat Output: Approximately 50-watts per sq. ft with 3" cable spacing for fastest snow melting
- Best for Heavy Snowfall: Recommended for regions with 60+ inches of annual snowfall or when rapid melting is critical
- Even Heating: Pre-attached heating elements in a serpentine pattern with consistent 3" spacing ensures uniform coverage
- Fast and Easy Installation: Cut-and-turn design makes installation faster than cables while providing maximum heat density
- Installation Support: Free SmartPlan™ installation plans, 24/7 phone support, and a 10-year limited warranty
Optimal Performance & Energy Balance (4" spacing)
The versatile choice for moderate snowfall regions (30-60 inches annually). The 4-inch cable spacing provides an optimal balance of melting performance (~39 watts/sq.ft) and energy efficiency. Best for: Most residential driveways, walkways, and patios in typical winter climates.
- Balanced Heat Output: Approximately 39-watts per sq. ft with 4" cable spacing for optimal performance and efficiency
- Best for Moderate Snowfall: Recommended for regions with 30-60 inches of annual snowfall—our most popular choice
- Even Heating: Pre-attached heating elements in a serpentine pattern with consistent 4" spacing ensures uniform coverage
- Fast and Easy Installation: Cut-and-turn design makes installation faster than cables while balancing cost and performance
- Installation Support: Free SmartPlan™ installation plans, 24/7 phone support, and a 10-year limited warranty

Maximum Flexibility at a Minimal Cost
WarmlyYours Snow Melt Cables offer a high heat output solution to keep your driveway, walkway, or patio snow-free. Embeddable in concrete, asphalt, or under pavers, these cables provide a flexible and cost-effective alternative to mats. Choose from a variety of voltages and lengths to suit your outdoor heating needs, ensuring safe, dry surfaces all winter long. Benefit from our 10-year warranty and 24/7 customer support for peace of mind.
- High Heat Output: This embeddable electric heating cable provides 12-watts of heat per linear foot (nearly 50-watts per sq. ft.)
- Embeddable in Concrete, Asphalt, or in Mortar Under Pavers: Installing a cable-based snow melting system within a new driveway, walkway, or patio means you can enjoy snow/ice free outdoor surfaces all year
- Cost-Effective and Flexible: Snow melting cables are an less expensive (but more time consuming) alternative to snow melting mats and they provide maximum flexibility to cover round driveways, cornered patios, or outdoor stairs
- Wide Variety of Voltages: We offer snow melting cables in 120, 208, 240, and 277 voltages and in a range of different lengths
- Installation Support: WarmlyYours offers free SmartPlan™ installation plans, 24/7 phone support, and a 10-year limited warranty

Controls for Patio Snow Melting
WarmlyYours offers a wide variety of controls for our snow melting systems—from a manual option with a timer to an automatic option that will turn on when it senses snow is falling.
These controls are able to function with the use of sensors. There are two main types: slab sensors (installed with the heating element to measure surface conditions) and aerial sensors (installed in the open to detect whether it's snowing).
For more information about the variety of snow melt controls and sensors, check out this comparison chart.
Shop ControlsExplore Snow Melting Applications
Snow melting systems work in a variety of outdoor surfaces and applications:


")


")

")

Consult with a Snow Melting Expert
Have questions about heating your concrete patio? Our experts will respond within 1 business day.
Typically respond within 1 business day