

In This Article
Why Selection and Layout Decide Everything
Here is the truth that surprises most people new to radiant heating: when a floor heating job disappoints, the floor heating systems are almost never the culprit. In our experience, roughly 90% of complaints and callbacks trace back to planning — the wrong system for the space, heat placed where nobody stands, or a voltage mismatch — not to a defective product.
That is good news, because planning is the one part of the job you fully control. Get the selection and layout right on paper, and the heat takes care of itself. The golden rule from our experts: never design on the fly. Field-measure the space before you order or install, because you can never cut the heating cable to make it fit a room that shrank between the estimate and the tile.
Quick Facts
- The 90% rule: Most floor heating problems are planning failures, not product failures.
- You can’t cut the cable: Always field-measure before installing.
- 3” spacing is the sweet spot: Delivers about 15 watts per square foot for primary heat.
- 120V covers ~120 sq ft: Step up to 240V for larger areas — it heats at the same speed.
- Warm-up takes 30–90 minutes: Faster over insulation, slower over a cold concrete slab.
Watch the 60-second overview, then we’ll break down each decision a pro makes.
Step 1: The “Floor Heating Sandwich” — Choosing Your System
The easiest way to think about system selection is as a sandwich: tell us what’s on top (your finished flooring) and what’s on the bottom (your subfloor), and the job is to fill the middle with the right heating element. One size does not fit all — the shape of the room, the fixtures, and the complexity of the space decide which product wins.
| System | Best For | Why It Wins |
|---|---|---|
| Easy Mat | Targeted, drop-in spots | Fast to place in defined areas; keep it to a maximum of two connections per run. |
| Flex Roll | Large, rectangular rooms | One connection, roll it out and cut-and-turn the mesh to fill the field efficiently. |
| Custom Mat | Complex geometry & multifamily | Built exact-to-the-inch at the factory — no on-site modification, ideal for repeatable units. |
| TempZone Cable / Ruler Cable | Odd shapes & surgical precision | Loose cable follows any layout; the new Ruler Cable is a Trade Pro exclusive with hash-mark spacing guides, installed with grip strips or a Prodeso membrane. |
Match the product to the room, not the other way around
A big open kitchen wants a Flex Roll; a bathroom crowded with a vanity, toilet, and tub wants cable so you can weave around every no-heat zone. Forcing the wrong product into a space is where leftover material and cold spots come from.
Step 2: Plan the Layout Like a Pro
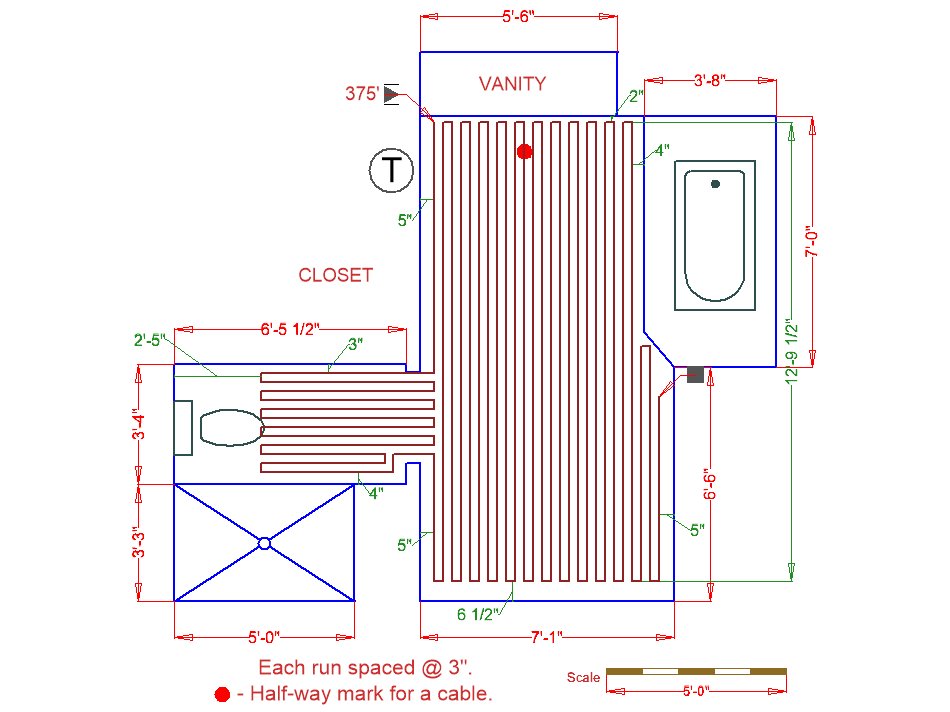
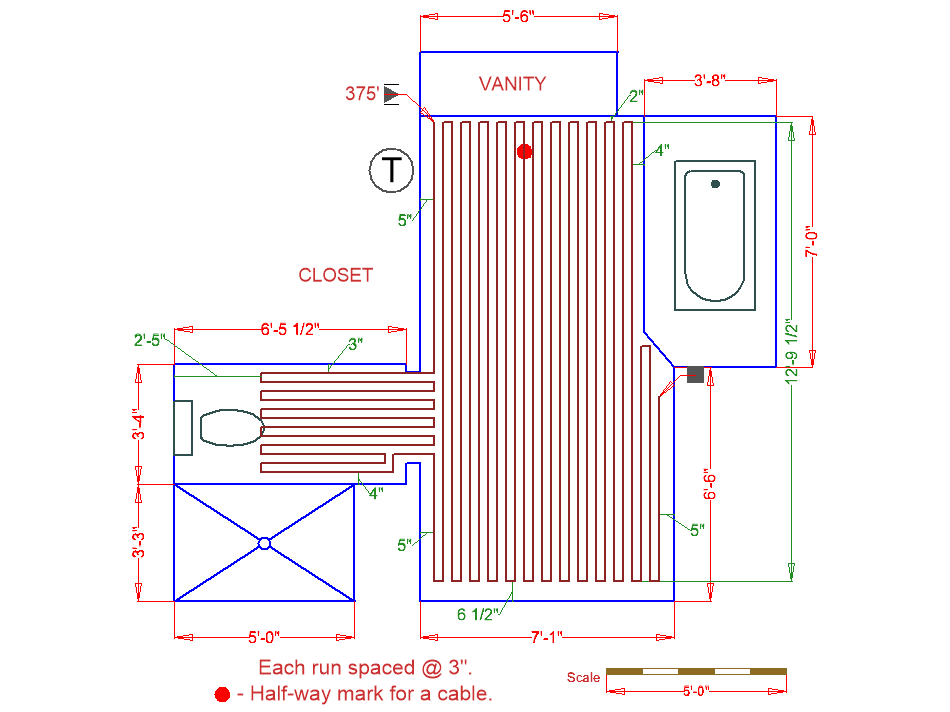
Heat only radiates about 1.5” out from the element — no element means no heat. So the layout is really a map of where feet actually land: in front of the vanity, stepping out of the shower or tub, along the main walking path. Think in zones, not rooms. Pull the element back from walls and thresholds, and break large open spaces into functional zones, each with its own thermostat.
Pro Resource: Mat vs. Cable Selection Calculator & Layout Planning Sheet
The video above walks through our downloadable planning sheet for tile floors. Grab the Mat vs. Cable Selection Calculator & Layout Planning Sheet (PDF) to size your system, map your zones, and mark every no-heat area before you set a single tile.
Mark Your No-Heat Zones and Obstacles
A clean layout plan calls out every place the element must not go. Skipping this is the number-one source of jobsite surprises:
- Under tubs, showers, and non-floating vanities — trapped heat has nowhere to go.
- 4” from the toilet flange to protect the wax ring.
- 2” from HVAC floor vents, and never over structural posts or expansion joints.
- The easy-to-forget stuff: door tracks, door stops, shower glass-door screw lines, and drains.
Local code and your AHJ (plus the NEC) drive several of these clearances, so confirm them before you finalize the drawing.
Step 3: Spacing Is Heat Output
How tightly you space the cable directly sets the wattage per square foot — which is how you match the system to the room’s heat loss. Tighter spacing packs in more watts for primary heat; wider spacing is fine for a floor that is already warm.
| Cable Spacing | Approx. Output | Best Use |
|---|---|---|
| 3” | ~15 W/sq ft | The sweet spot — primary heat, concrete slabs, and three-season rooms in cold climates. |
| 4” | Standard comfort | Everyday floor-warming comfort in moderate climates. |
| 5” | ~9 W/sq ft | Supplemental warmth on already-warm upper floors. |
Concrete is a heat sink
Installing over a slab? Add an insulating underlayment such as ThermalSheet. Without it, the cold concrete pulls heat downward, lengthening warm-up time and driving up operating cost.
Step 4: Get the Voltage and Wiring Right
A quick rule of thumb: a 120V system covers about 120 square feet; go to 240V above that. Here’s the myth worth busting — 120V and 240V heat at the same speed. Higher voltage lets you drive more square footage on a circuit; it does not warm the floor faster, so don’t over-spec 240V and waste a breaker slot.
- Match the voltage to the lead: factory leads are color-coded (yellow = 120V, red = 240V). A mismatch means the floor never warms up — or the wire fails.
- Protect the factory splice: bury it in the mortar, and never bend it.
- Use a dedicated circuit: a non-GFCI dedicated circuit (the thermostat provides the GFCI protection) avoids nuisance trips.
- Big jobs: pair a thermostat with power modules in 15-amp increments to run large or multi-zone areas.
Let Us Plan It For You — Free SmartPlan
Everything above is exactly what our engineering team does for you at no cost with a free SmartPlan. Send us the dimensions and the flooring sandwich, and you get back a scale layout drawing, the recommended system and spacing, plus a breaker, wattage, and operating-cost sheet — typically with next-day turnaround.
Want the complete masterclass first? Watch the full webinar below.
Ready to plan a flawless floor heating job?
Skip the guesswork and the callbacks. Send us your room and flooring details and our team returns a complete, installation-ready plan for a floor heating system — the same pro process this guide walks through.
Prefer to talk it through? Call our team at (800) 875-5285.
Floor Heating Planning FAQs
In a typical bathroom with tile or stone flooring, radiant floor heating takes about 30 to 45 minutes to reach your desired temperature. Using a programmable thermostat allows you to schedule the heat to come on before you wake up, ensuring a warm floor for your morning routine.
Electric radiant floor heating should not be installed under permanent fixtures that may trap heat. However, if the vanity or cabinets are "floating" or are on legs, then a floor heating system may be installed under it.
Spacing sets heat output. Use 3-inch spacing (about 15 watts per square foot) for primary heat, concrete slabs, and cold-climate rooms. Use 4-inch for standard comfort in moderate climates, and 5-inch (about 9 watts per square foot) for supplemental warmth on floors that are already warm.
No. A 120V and a 240V floor heating system heat at the same speed. Higher voltage simply lets you power more square footage on a single circuit — it does not make the floor warm faster. As a rule of thumb, use 120V up to about 120 sq ft and step up to 240V for larger areas.
Yes. Electric floor heating should run on its own dedicated, non-GFCI circuit — the thermostat provides the required GFCI protection. A dedicated circuit prevents nuisance trips and ensures the system gets the amperage it needs. Large areas can use a thermostat paired with power modules in 15-amp increments.
Have Questions About Your Project?
Our team of Radiant Experts is ready to help!
Related Articles

How WarmlyYours Engineers the Perfect Floor Heating Installation Plan
Bathroom Tile Heating Installation: The 5-Step Pre-Install Checklist for Pros (Part 1 of 2)
9 Pros and Cons of Radiant Floor Heating (Honest Review)
Stay Updated
Get the latest radiant heating news and tips delivered to your inbox.