
")
In This Article
Installing an LED bathroom mirror is one of the fastest ways to upgrade both the look and the lighting of a bathroom. But because most LED mirrors are heavier than standard mirrors and require hardwired electrical connections, the process can feel intimidating for DIYers and even some pros.
This step-by-step LED bathroom mirror installation guide walks through planning, wall mounting, wiring, and testing, using WarmlyYours LED mirrors as the example. Use it alongside the product-specific installation manual and our video tutorial to make sure your install is safe, code-friendly, and built to last.
Before You Start
- Always follow local electrical codes and consult a licensed electrician for hardwired connections.
- Read the installation manual for your specific LED mirror model.
- Watch our video guide: How to Install a WarmlyYours LED Mirror.
Tools, Materials, and Safety Checks
Good preparation makes LED mirror installation smoother and safer. Before you drill or disconnect power, take a few minutes to gather your tools and confirm that the wall and electrical circuit are ready.

Common tools and materials:
- Drill and bits appropriate for your wall type (stud, drywall, tile, or masonry)
- Level and tape measure
- Stud finder and pencil for marking mounting points
- Wall anchors and screws rated for the mirror’s weight (often included with the mirror)
- Wire strippers, screwdrivers, and wire connectors (wire nuts)
- Voltage tester to confirm power is off
- Protective gear: safety glasses and gloves
Safety checks before you begin:
- Turn off power at the breaker to the circuit feeding the mirror location.
- Use a voltage tester to verify that the wires at the junction box are not live.
- Confirm the wall can support the mirror’s weight and that you have solid mounting points or appropriate anchors
Step 1: Unbox and Inspect the LED Mirror
Start by carefully removing the LED mirror from the box. Take off the corner padding and bubble wrap so you can see the mirror clearly.
What to look for:
- Check the glass for any damage from shipping.
- Notice the LED strips that run around the mirror behind the frosted border.
- Look for the on/off switch on the front so you know where the control will be once the mirror is on the wall.
- Take note of the beveled edge around the mirror, which will affect how high you want it to sit visually above the vanity.
If everything looks good at this stage, you’re ready to flip the mirror over and inspect the back for mounting points and the electrical junction box.
Step 2: Inspect the Back and Mounting Points
Next, flip the LED mirror over so you can see the back. This is where you’ll find the mounting hardware and the electrical junction box.

What to look for on the back:
- The mounting points where the mirror will hang on the wall (often four, one near each corner).
- The junction box where the 120V electrical connection will be made.
- The wiring leaving the junction box that will connect to the wall box behind the mirror.
Once you know exactly where the mounting points and junction box are, you’re ready to plan your wall layout and the electrical alignment in the next step.
Step 3: Plan the Mounting Height, Layout, and Wall Box Alignment
Before you mark mounting holes or hang the mirror, plan exactly where it will sit on the wall and make sure the wall’s electrical box lines up with the junction box on the back of the mirror. A few minutes of planning here will make wiring easier and help you avoid awkward gaps or off-center installs.
1. Center the mirror and choose the height
- Center the mirror on the vanity width so it lines up with the sink and faucet.
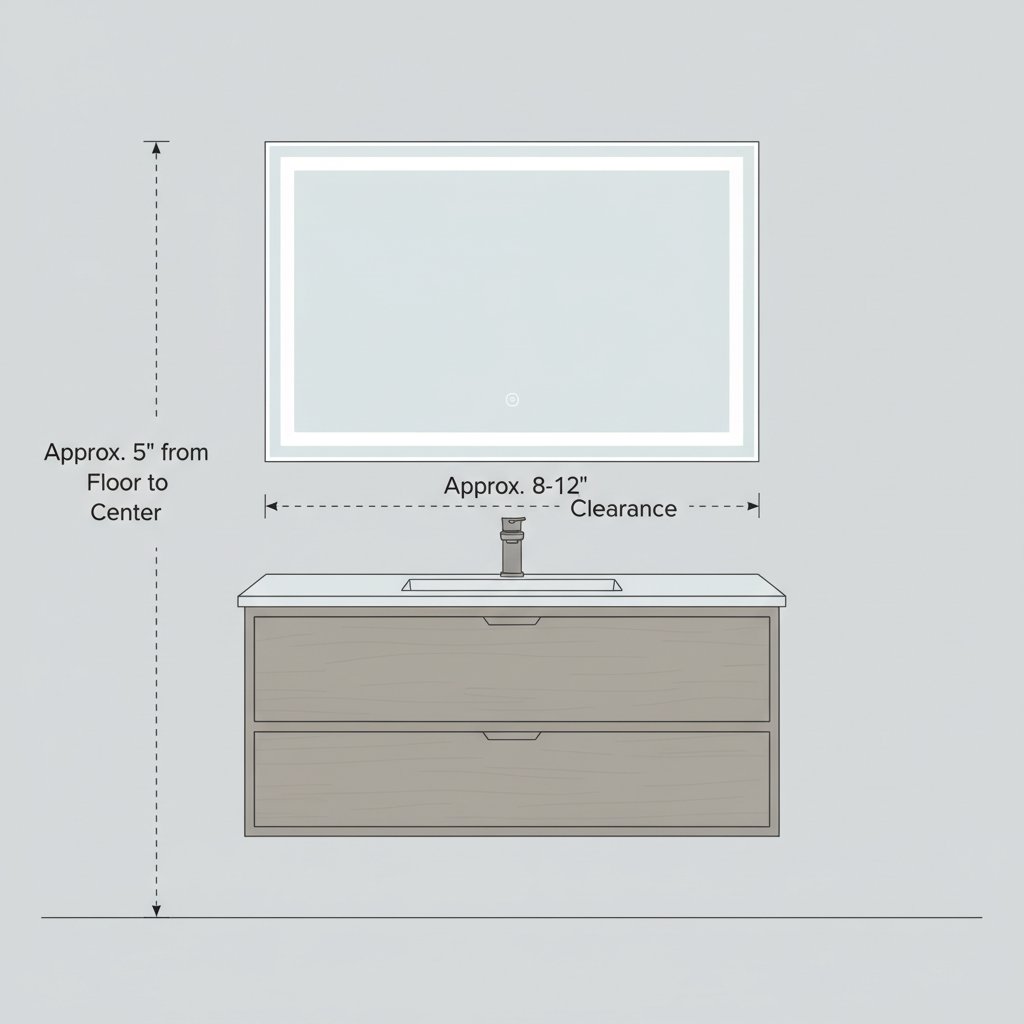
- Aim for the mirror’s center to be roughly at eye level for the primary user, often around 60"–64" from the finished floor.
- Leave enough clearance above the faucet and backsplash so the mirror doesn’t feel crowded, typically 4"–6".
2. Match the wall box to the mirror’s junction box location
- Use the back-of-mirror diagram to see where the electrical connection box sits on the mirror.
- Install or verify the wall electrical gang box so that, once the mirror is mounted, the wall box will sit directly behind the mirror’s junction box.
- Confirm there is enough room for the wires to bend and for the mirror to sit flat against the wall.
3. Plan how you will route and secure the wires
- Decide how the installer-supplied wire will enter the mirror’s junction box from the wall box.
- Make sure you have enough wire length to hold the mirror near the wall while making connections—often at least 2 feet is recommended.
- Plan to use the built-in clamp or strain relief on the junction box so the wire is secured and can’t be pulled loose once the mirror is mounted.
When you’re happy with the layout and the wall box alignment, use a level and a tape measure to lightly mark the planned top and bottom edges of the mirror on the wall. You’ll use these reference lines in the next step when you install the mounting hardware.
Step 4: Install the Mounting Hardware and Test-Fit the Mirror
With your layout marked on the wall, the next step is to install the mounting hardware and make sure the mirror will hang level and flat before you complete the wiring.
1. Mark the mounting hole locations
- Using the reference lines from Step 3, mark the exact locations for the mounting points based on the spacing you measured on the back of the mirror.
- Double-check that the distance between the marks on the wall matches the distance between the mounting points on the mirror.
- Confirm that the marks are level by using a spirit level across both points.
2. Drill holes and install anchors
- Drill pilot holes at the marked locations using a bit appropriate for your wall type (stud, drywall, tile, or masonry).
- If you are not going into studs, insert wall anchors rated for at least the weight of the LED mirror.
- Tap the anchors flush with the wall surface so the mounting screws will seat properly.
3. Install the mounting screws
- Drive the mounting screws into the anchors or studs, leaving the screw heads slightly proud so the mirror’s keyholes or brackets can hook onto them.
- Make sure both screws are at the same depth so the mirror will sit level.
4. Test-fit the mirror on the hardware
- With a helper, carefully lift the LED mirror and hook the mounting points onto the screws.
- Check that the mirror sits flat against the wall and that it is level from side to side.
- If needed, make small adjustments to screw depth or anchor placement until the mirror hangs correctly.
Once you are satisfied with the fit and alignment, remove the mirror again or tilt it away from the wall so you have clear access to the junction box for making the electrical connections in the next step.
Step 5: Make the Wiring Connections
With the mounting hardware in place and the mirror test-fitted, you’re ready to make the electrical connections. Take your time with this step and always verify that the power is off before touching any wires. As in Step 4, grab a helper - safety first!
1. Confirm the circuit is off
- Turn off the circuit breaker feeding the wall box where the mirror will connect.
- Use a voltage tester or meter to confirm that the wires in the wall box are not live.
- If you are not comfortable making electrical connections, hire a licensed and bonded electrician to complete this step in compliance with local codes.
2. Open the junction box on the mirror
- On the back of the mirror, locate the black junction box where the “mains in” connection is made.
- Remove the screws and carefully lift off the cover to expose the terminals and wiring.
- Note that the black component on the back is the rear of the front-mounted power switch, and the LED driver inside converts 120V AC to low-voltage DC for the LED strips.
3. Use a jumper cable for easier connections
- Attach an installer-supplied jumper cable to the mirror’s junction box so you can make your connections at the wall box more easily.
- Leave enough wire length—often at least 2 feet—so one person can hold the mirror while another pushes the wires back into the wall box.
- Route the jumper neatly so it does not interfere with the mounting points or prevent the mirror from sitting flat against the wall.
4. Connect line and neutral in the wall box
- At the wall electrical box, connect the neutral from the mirror’s jumper to the neutral in the wall box using an approved wire connector.
- Connect the line (hot) conductor from the mirror’s jumper to the hot conductor in the wall box.
- Gently tuck the connections back into the wall box, making sure no bare copper is exposed and no wires are pinched.
5. Secure the wiring and close the junction box
- Back at the mirror, make sure the jumper cable is properly clamped or secured where it enters the junction box so it cannot be pulled out.
- Reinstall the junction box cover, taking care not to pinch any wires.
- Verify that all screws are snug and that the wiring harness and low-voltage leads are routed cleanly.
Once the wiring is complete and the junction box cover is back in place, you’re ready to hang the mirror on the mounting hardware for the final time and restore power at the breaker for testing.
Step 6: Final Testing and Troubleshooting
With the wiring complete and the junction box closed, you can hang the mirror on the mounting hardware for the final time and test the installation.
1. Hang the mirror and check the fit
- With a helper, carefully lift the LED mirror and hook the mounting points onto the screws or brackets installed in Step 4.
- Make sure the mirror sits flat against the wall and that there is no pressure on the wiring behind it.
- Confirm that the mirror is level and centered over the vanity.
2. Restore power and test the mirror
- Turn the circuit breaker back on for the mirror’s circuit.
- Use the front-mounted on/off switch to turn the LED mirror on and off.
- Check that the LED lighting is even around the frosted border and that there is no flickering.
3. Basic troubleshooting if something isn’t working
- If the mirror does not turn on, verify that the breaker is on and that the wall switch (if used) is in the correct position.
- Turn the breaker back off and double-check the line and neutral connections in the wall box and junction box.
- Confirm that all wire connectors are tight and that no wires have come loose while the mirror was being hung.
- If you cannot identify the issue quickly, contact a licensed electrician or reach out to WarmlyYours technical support for assistance.
Once the mirror powers on reliably and sits level and secure on the wall, your LED bathroom mirror installation is complete. Enjoy the improved lighting, modern look, and everyday convenience of your new LED mirror.
LED Bathroom Mirror Installation FAQs
Do LED bathroom mirrors need an electrician to install?
Most LED bathroom mirrors are hardwired to a 120V circuit, which means the electrical connections should be made by a licensed electrician, especially if you’re adding a new circuit or moving an existing junction box. If you’re simply replacing an existing hardwired fixture on the same circuit and you’re comfortable with basic wiring, you can follow the manufacturer’s instructions and local codes—but when in doubt, hire a pro.
How high should I mount an LED bathroom mirror?
A common guideline is to place the center of the mirror around 60"–64" from the finished floor, so it’s roughly at eye level for most users. In a bathroom, it’s also important to center the mirror over the vanity and leave about 4"–6" of clearance above the faucet and backsplash so the mirror doesn’t feel crowded.
Can I install an LED mirror on tile?
Yes, you can mount an LED bathroom mirror on tile, but you’ll need the right drill bit and anchors. Use a carbide or diamond-tipped bit designed for tile, drill slowly to avoid cracking the surface, and use anchors rated for the full weight of the mirror. Always confirm that the wall behind the tile can support the load.
Do LED mirrors need a separate switch?
Many LED mirrors include a built-in touch or rocker switch on the front of the mirror, but they still need a wall switch or breaker to control power to the circuit. For everyday convenience, most homeowners keep the breaker on and use the wall switch and the mirror’s built-in switch together to control the light.
What if my junction box isn’t in the right place?
If the existing wall box doesn’t line up with the mirror’s junction box, you may need to move the box or add a new one so it will be hidden behind the mirror once it’s mounted. This is usually work for a licensed electrician, who can reroute the wiring, patch the wall if needed, and make sure everything meets local code.
Need Help Choosing or Installing an LED Bathroom Mirror?
If you’re still planning your project or you ran into a question that this guide didn’t cover, our team is here to help. WarmlyYours has installed radiant heating and LED mirror solutions in thousands of homes, and our technical support team can walk you through product selection, layout, and installation details.
Ready to take the next step?
Prefer to talk it through? Contact our 24/7 technical support team.
Planning a full remodel? Learn how LED mirrors pair with floor heating on our floor heating page.
Have Questions About Your Project?
Our team of Radiant Experts is ready to help!

Related Articles


Stay Updated
Get the latest radiant heating news and tips delivered to your inbox.