

In This Article
While properly installed radiant floor heating systems, including heating mats and loose heating cables, are built for durability, most issues arise from accidental damage to the heating wire.
A tile setter might accidentally sever a wire while troweling. A grout knife could nick a heating cable. A previous repair may fail, or a hole drilled for a new doorstop could unknowingly cut through a heating wire.
These issues can cause your electric floor heating to stop working, but the good news is that repairs are possible (many people incorrectly think that a floor will need to be completely replaced). The tricky part is finding the break, but WarmlyYours has the tools and expertise to help.
Turning Off the Circuit Breaker Before Troubleshooting
Before beginning any diagnostic or repair work on your electric floor heating system, it is crucial to turn off the circuit breaker supplying power to the system. This ensures safety and prevents further damage to the heating mats or cables.
Steps to Safely Power Down the System:
- Locate the circuit breaker panel in your home.
- Identify the breaker that controls the floor heating system—this should be labeled in the panel.
- Switch the breaker to the “OFF” position to disconnect power.
- Use a voltage tester on the thermostat wiring to confirm the power is off before proceeding with troubleshooting.
⚠ Important: Never attempt to diagnose or repair a heating system while it is still powered. Always verify that the circuit is completely de-energized before continuing.
Identify the Issue
Before locating a break, confirm whether the issue is a break or a short circuit.
Check Ohms Readings
- Use a multimeter to check the floor circuit.
- Break: A wire is severed if the Ohms reading is open or infinite.
- Short: If Ohms readings exist between a core wire and the ground sheathing, you have a short circuit.
For additional guidance, WarmlyYours provides a detailed PDF guide and an instructional video to help you through the troubleshooting process:
📄 PDF Guide: How to Take Ohm Readings
📺 Video Tutorial: Troubleshooting a GFCI Issue
These resources walk you through step-by-step troubleshooting to accurately diagnose your heating system issue.
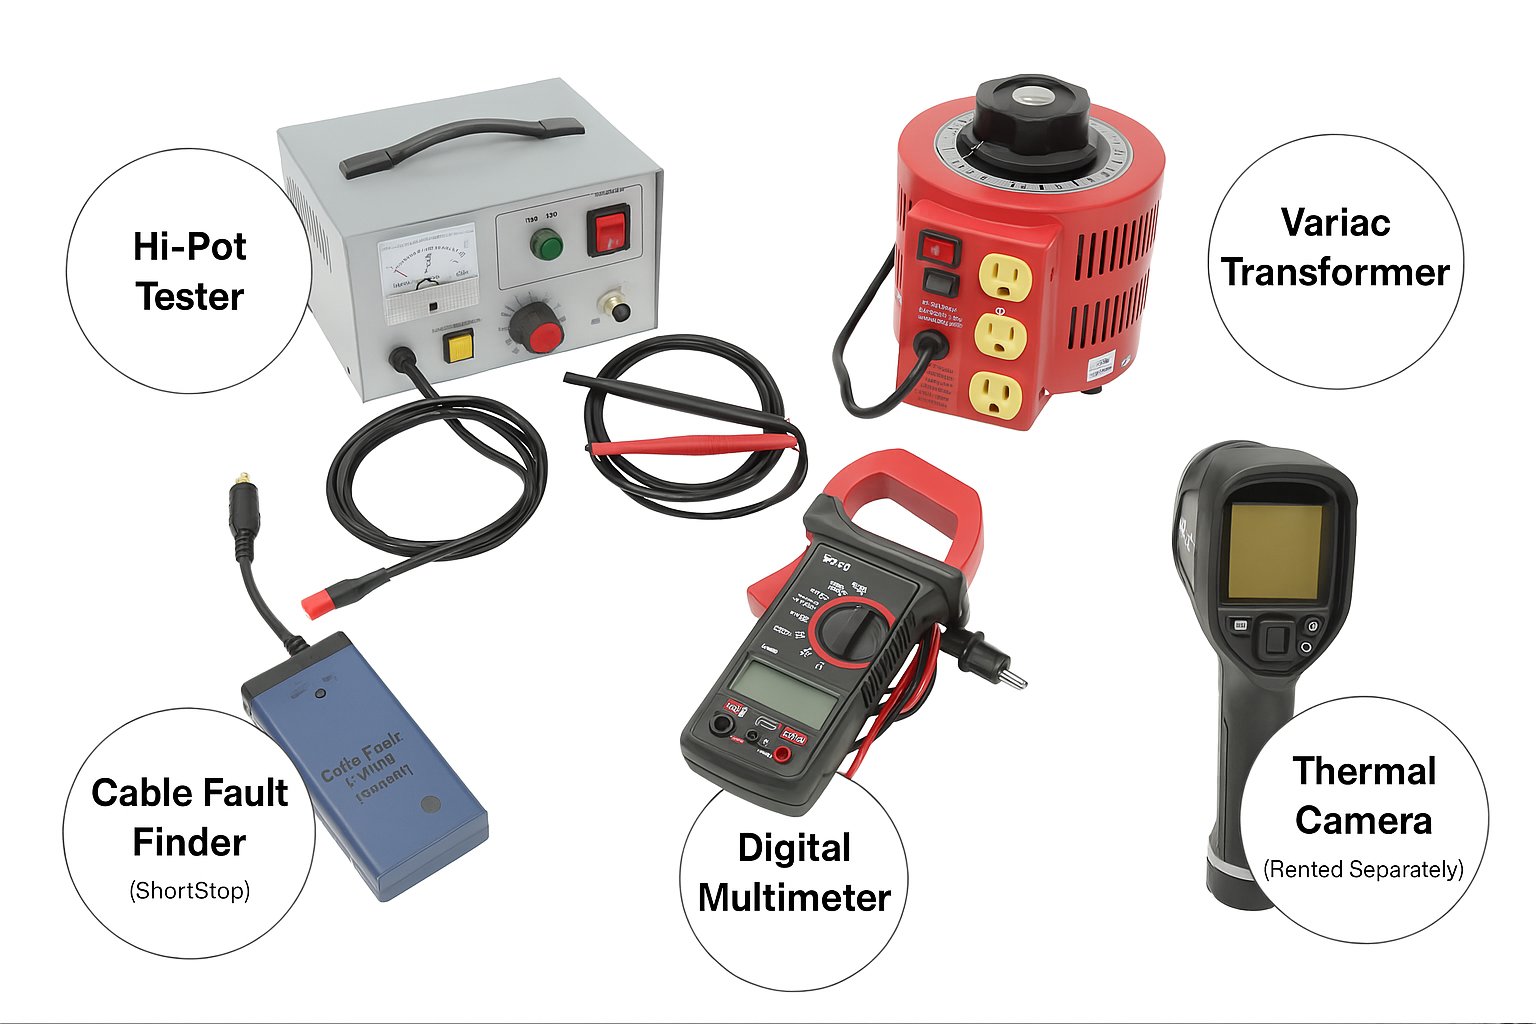
Rent a WarmlyYours Troubleshooting Kit (TSK)
If you have a confirmed break or short in your electric floor heating system, WarmlyYours offers a Troubleshooting Kit (TSK) for rent. This kit includes all the essential tools needed to accurately locate and repair problems, ensuring your system operates again.
Renting the WarmlyYours Troubleshooting Kit (TSK) involves the following costs and terms:
- Rental Fee: $150 for a 5-business-day period.
- Deposit: A refundable deposit of $500 is required. This amount is charged to your credit card and refunded upon the kit’s return, minus the rental fee and any additional charges.
What’s Included in the TSK?
- Hipot (for locating breaks) – Must be plugged into a non-GFCI-protected outlet
- Variac (for locating shorts)
- Multimeter – For measuring resistance and verifying continuity
- Shortstop – Measures the distance to the break
- Splice Repair Kits – For fixing damaged heating wires
Additional Tools Provided
-
16 AWG Extension Cord (Prepped for Amperage Testing)
- The outer insulation is removed (8”-12”) to expose the hot, neutral, and ground wires
- Designed for use with theVariac to test amperage using a clamp meter
-
10’ of cold lead – Used for:
- To repair a section of the heating wire that needs to be cut out (that area will lose heat)
- To replace a cold lead that is too short to reach the thermostat
Optional Tools for Rental
• Thermal Imaging Camera (TIC) – Available for separate rental and required to visually locate heat inconsistencies
Renting the WarmlyYours Thermal Imaging Camera (TIC) involves the following costs and terms:
- Rental Fee: $100 for a 5-business-day period.
- Deposit: A refundable deposit of $500 is required. This amount is charged to your credit card and refunded upon the camera’s return, minus the rental fee and any additional charges.
What You’ll Need to Provide
-
Heavy-Duty Extension Cord (With Ground Intact)
- Required for reaching a non-GFCI outlet for use with the Hipot
- Hipot will not function on a GFCI-protected circuit
By using this troubleshooting kit, you’ll have everything needed to accurately locate and repair issues in your floor heating system.
Once you receive the troubleshooting kit, follow these steps to determine the issue and select the appropriate tool:
- Suspect a break in the wire? → Use the Hipot (dielectric strength tester).
- Dealing with a short circuit? → Use the Variac (variable AC transformer).
- Need to pinpoint the exact location of the issue? → Start with the Shortstop (time-domain reflectometer).
If a WarmlyYours SmartPlan is available, refer to it to help identify the possible location of the break or short more accurately. If you purchased your system directly from WarmlyYours, we keep a record of your floor plan, which can assist in pinpointing the issue. Contact us for access to your original layout to streamline the troubleshooting process.
Step-by-Step Guide to Finding and Repairing Electric Floor Heating Wires
Follow these overview steps to diagnose, locate, and repair a break or short in your heating wire. For comprehensive, step-by-step troubleshooting instructions, refer to our detailed troubleshooting guide:
📄Floor Fault Location Thermal Camera Troubleshooting Kit Instruction (English)
This document provides in-depth guidance on using the troubleshooting kit effectively to identify and fix heating wire issues.
Using the Shortstop to Narrow Down the Problem Area
Begin troubleshooting with the Shortstop, which measures the length of the wire to the point of damage. This helps efficiently locate the affected area before using other tools.
Example:
- If the Shortstop reading is 40 feet on a TempZone Flex Rolls project, the damage is likely within the first 5-6 feet of the heating mat.
- If you are troubleshooting a cable, the reading represents the number of feet along the cable, including the cold lead.
For a step-by-step visual guide, watch this video on how to install and use the Shortstop device:
📺 How to Install a Shortstop Device for TempZone Twin
Identifying a Break Using the Hipot Process
If you suspect a break in the heating wire, the Hipot (dielectric strength tester) can help locate the fault.
Important: This step should only be performed by a licensed electrician.
Steps:
1. Attach the black clamp to the ground and press the reset button on the Hipot.
2. Touch the red probe to the black or red/yellow wire in 2-second bursts to create an arc.
3. Repeat every 2 seconds for 10 minutes, allowing the wire to heat up.
4. Scan the floor with a Thermal Imaging Camera (TIC) to locate a small, dime-sized heat spot, which marks the break.
🔹 Pro Tip: For better thermal imaging results, darken the room by covering windows, turning off lights, and shutting down any heat sources like the furnace.
If No Heat Spot Appears:
- Retest the Ohms readings.
- If a short circuit develops, switch to the Variac process in Step 2.
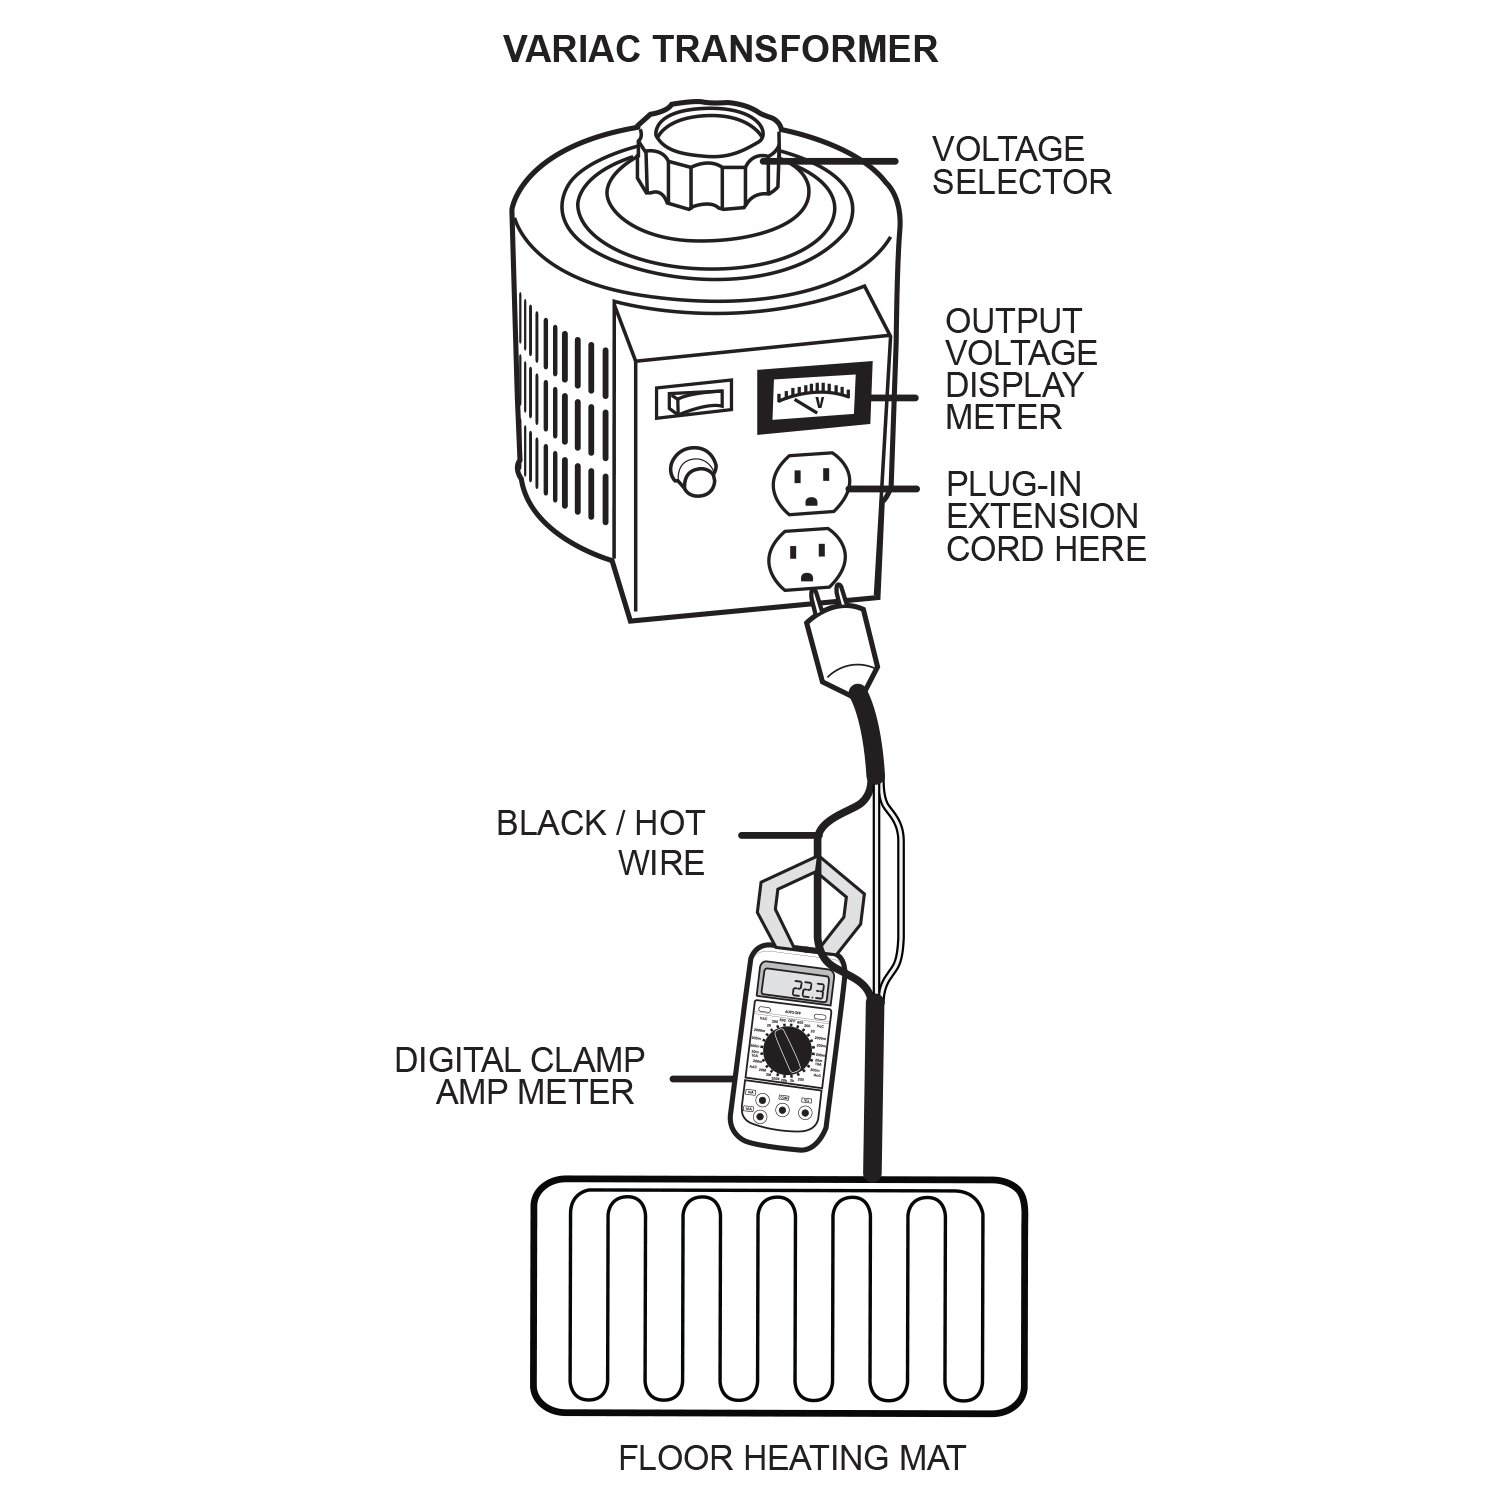
Locating a Short Using the Variac Process
If the wire has a short circuit, the Variac method is safer than the Hipot as it uses low voltage.
Steps:
1. Plug the supplied extension cord into the Variac.
2. Connect the exposed end of the extension cord to both the core wire and the ground shield.
3. Use a clamp amp meter set to amperage and clamp it around the line wire in the extension cord.
4. Slowly turn the Variac dial up, increasing voltage gradually.
Preparing for Safe Voltage Testing:
- Before adjusting the voltage, check the factory Ohms value and voltage of your system.
- This information can be found on the original product label, your WarmlyYours order records, or by calling customer support at 800-875-5285.
- Use a digital Ohmmeter to measure resistance between a core wire and the ground and compare it to the factory value.
Determining Safe Voltage Limits:
- If the measured Ohm value is 50% of the factory value, the maximum voltage for testing should be 50% of the system’s operating voltage:
- For a 120V system → Max troubleshooting voltage = 60V
- For a 240V system → Max troubleshooting voltage = 120V
📞 Not sure? Call WarmlyYours Technical Support at 800-875-5285 before proceeding!
Running the Variac Test Safely
1. Always start at zero volts! Never begin testing at the maximum voltage.
2. Gradually increase voltage using the Variac dial.
- If the maximum voltage is 50-60V, you can usually see results with a thermal camera at 20-30V.
- Do NOT increase voltage too quickly! Using too much voltage can burn out the circuit.
3. If you don’t have system details (Ohm values, voltage, etc.), follow these tips or contact WarmlyYours Technical Support.
- Ensure a steady amp draw of 1.5–2 amps or more, depending on the location of the damage in the heating element, and let it run for at least 10 minutes.
- To measure the amp draw, use a digital clamp amp meter and place it around the line wire in the extension cord. This will provide an accurate reading of the system’s current flow during testing.
Confirming the Short & Locating the Exact Spot
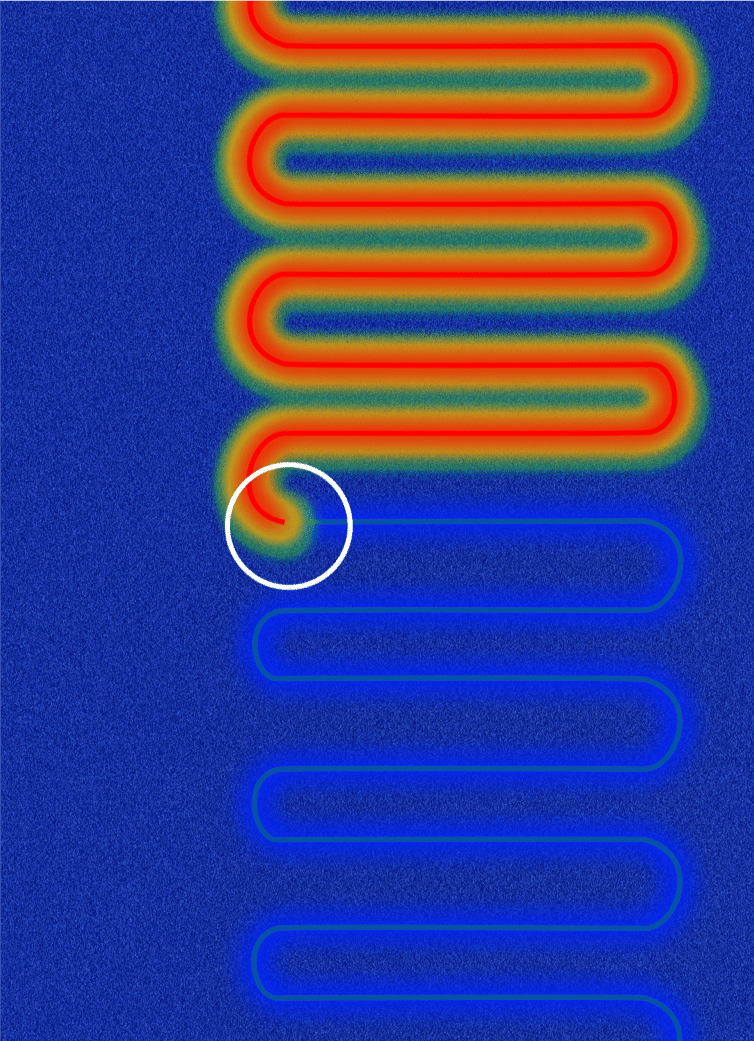
Using the Thermal Imaging Camera (TIC) to Locate the Short
Scan the floor with the TIC.
- The heated wire will appear as a red or orange line on the thermal image.
- The short circuit is where the line suddenly stops.
⚠ If the amp draw drops to zero, the short is broken, and you must redo the Hipot process before proceeding.
Exposing and Repairing the Damaged Wire
Once you have identified the exact location of the break or short, follow these steps to repair the heating wire:
1. Carefully remove the tile at the damaged location. Use appropriate tile removal techniques to avoid unnecessary damage to surrounding tiles.
2. Expose the damaged section of the heating wire. Use a dull screwdriver (avoid sharp tools) to chip away tile and thinset between the wires. Do not use a tool to pry up tile pieces, as this can damage the surrounding heating wires.
3. Repair the wire using a splice repair kit. Never use electrical tape—it is not rated for floor heating repairs and may fail over time. A splice repair kit ensures a durable and safe fix.

4. Retest the Ohms readings before reinstalling the tile. Confirm that the Ohm values match the expected range before reinstalling the flooring.
🔹 Pro Tip: Before you begin, watch this video to see how the experts repair a damaged heating cable:
WarmlyYours also offers splice repair kits for purchase on our website, ensuring you have the proper materials for a safe and lasting repair.
Final Steps: Ensuring a Proper Repair
1. Run a final Ohms test after the repair to confirm the wire is functioning correctly.
2. Verify there are no additional breaks or shorts before reinstalling tile or flooring.
3. Test the system using the thermostat to ensure even heating across the surface.
By following these steps carefully, you can successfully locate, expose, and repair your electric floor heating system, restoring warmth and functionality. If you need additional guidance, contact WarmlyYours Technical Support at 800-875-5285.
Troubleshooting Tips and Common Mistakes
✅ No heat signature with TIC?
- Ensure the room is dark and cool for clearer imaging.
- Retry Hipot bursts: 2 seconds on, 2 seconds off for 10 minutes. Repeat as necessary.
✅ Short disappears while using the Variac?
- If the amp draw drops to zero, return to the Hipot process.
✅ TIC detects multiple heat spots?
- A previous faulty repair may also need fixing.
- Fix one spot first, then move on to the next.
- Verify each repair is successful before proceeding to the next location.
✅ Tile Removal Safety:
• Avoid using sharp tools to prevent further damage to the heating wires.
Final Steps and Next Actions
Key Takeaways:
✔ Use Ohms readings to confirm whether the issue is a break or a short.
✔ The Shortstop helps pinpoint the damage before using the Hipot or Variac.
✔ In most cases, the Hipot method locates breaks, while the Variac method identifies shorts.
✔ A TIC scan reveals the exact location of the damage.
✔ Always repair with a splice kit—never use electrical tape.
🔹 Need help? Contact WarmlyYours Technical Support at 1-800-875-5285 or rent a troubleshooting kit today!
To speak with a WarmlyYours account representative about renting our troubleshooting kit, use our contact us page and if at any point you have any questions, please don’t hesitate to contact our technical support team at 1-800-875-5285.
Have Questions About Your Project?
Our team of Radiant Experts is ready to help!

Related Articles


Stay Updated
Get the latest radiant heating news and tips delivered to your inbox.
Comments