

In This Article
Whether you are a homeowner tackling a straightforward DIY project or a trade professional looking for a reliable, time-saving solution, installing electric floor heating under tile can typically be completed in under a day. The process works by embedding a heating cable or mat in thinset directly below the tile, providing energy-efficient, radiant warmth via your heated tile floor. With TempZone™ Floor Heating Mats, both DIYers and PROs get a system that is easy to roll out and perfectly suited for tile and stone floors. Before starting, be sure to review common DIY tile installation mistakes to avoid and our DIY radiant floor heating and tile flooring guide.
Key Takeaways
- Project Time: Typically under a day for a standard room.
- Best For: Tile, stone, or marble floors using TempZone™ Floor Heating Mats.
- Cost: $10–$12 USD ($14–$16 CAD) per square foot for materials.
- Crucial Step: Always test the heating mat with a digital ohmmeter before, during, and after installation.
- Cure Time: Wait 7–28 days for the thinset to fully cure before powering on the system.
Why Choose TempZone Floor Heating Mats?

TempZone Floor Heating Mats from WarmlyYours are pre-spaced electric heating cables attached to a fiberglass mesh for simple layout and consistent heat distribution. They’re ideal for tile, stone, or marble floors and are embedded directly into thinset or self-leveling cement.
Unlike cable-only systems, TempZone Floor Heating Mats reduce layout time and installation errors—perfect for DIYers and homeowners who want a smooth project from start to finish.
Planning Your Installation
Planning your floor heating installation involves measuring the usable floor space—excluding areas beneath vanities, tubs, or toilets—and submitting a sketch to WarmlyYours to receive a custom SmartPlan™. This detailed layout includes:

- A custom installation diagram
- Electrical plan with circuit requirements
- Estimated operating costs
A SmartPlan also ensures clear communication between flooring installers and electricians—both trades must coordinate for a successful installation.
Bonus: WarmlyYours keeps records of all SmartPlans to assist with anything you might need in the future—whether it’s technical support, coordinating with a contractor, or transferring ownership to a new homeowner.
Explore Floor Plans: Explore our collection of indoor radiant heating projects showing their floor plan, detailed installation plan, and estimated cost.
Cost of Installing Floor Heating Under Tile
The cost of installing floor heating under tile includes upfront material costs—averaging $10 to $12 USD per square foot for TempZone™ Mats—as well as low ongoing operating expenses.
Low Operating Costs
The operating cost of electric floor heating is incredibly low. For example, a typical 1000-watt bathroom system costs just $0.16/hr to run.
To get a precise estimate for your specific room, try our interactive calculator below:
Operating Cost Calculator for Floor Heating
Estimate your daily and monthly energy costs based on room size and local rates."Most homeowners are surprised how affordable radiant floor heating is to operate—often just pennies a day for a bathroom. It's the kind of everyday luxury that pays for itself in comfort!"
— Rae RadiantWhat You’ll Need to Install Floor Heating Under Tile
To install floor heating under tile, you will need a heating mat, a thermostat, a digital ohmmeter, polymer-modified thinset, and basic tiling tools to ensure a smooth, uninterrupted process:
- WarmlyYours TempZone™ Floor Heating Mat or Cable
- WarmlyYours Thermostat (with floor sensor)
- Digital Ohmmeter (multimeter)
- Polymer-modified thinset mortar
- Plastic notched trowel (1/4” or 3/8”)
- Hot glue gun, double-sided tape, or staple gun (for securing the mat)
- Digital camera or smartphone (to take photos of the layout before tiling)
- Safety glasses and gloves
Step-by-Step Guide to Installing TempZone Floor Heating Mats Under Tile
1. Measure and Sketch Your Floor
Measuring and sketching your floor involves determining the usable heated area by excluding fixed objects like vanities, tubs, and toilets, and drawing a sketch with accurate dimensions.
Your sketch is required to receive a custom SmartPlan from WarmlyYours. Be sure to include:
- The room layout with dimensions
- Any floor vents
- The desired wall location for the floor heating thermostat
The SmartPlan also helps set expectations by highlighting which areas will be heated and which may not—such as within 12 inches of any wall, where floor heating is typically not prioritized because people rarely walk on those parts of the floor.
2. Prepare the Subfloor
Preparing the subfloor requires ensuring the surface is clean, dry, level, and completely free of any debris or sharp objects.
- For concrete slab subfloors, install ThermalSheet insulation in a staggered pattern to prevent heat loss.
- For wood subfloors, insulation isn’t necessary but a clean, level surface is essential.

3. Test the Heating Mats
Testing the heating mats involves using a digital ohmmeter before installation to verify that electrical resistance readings fall within 15% of the value listed on the UL label permanently attached to the heating element.
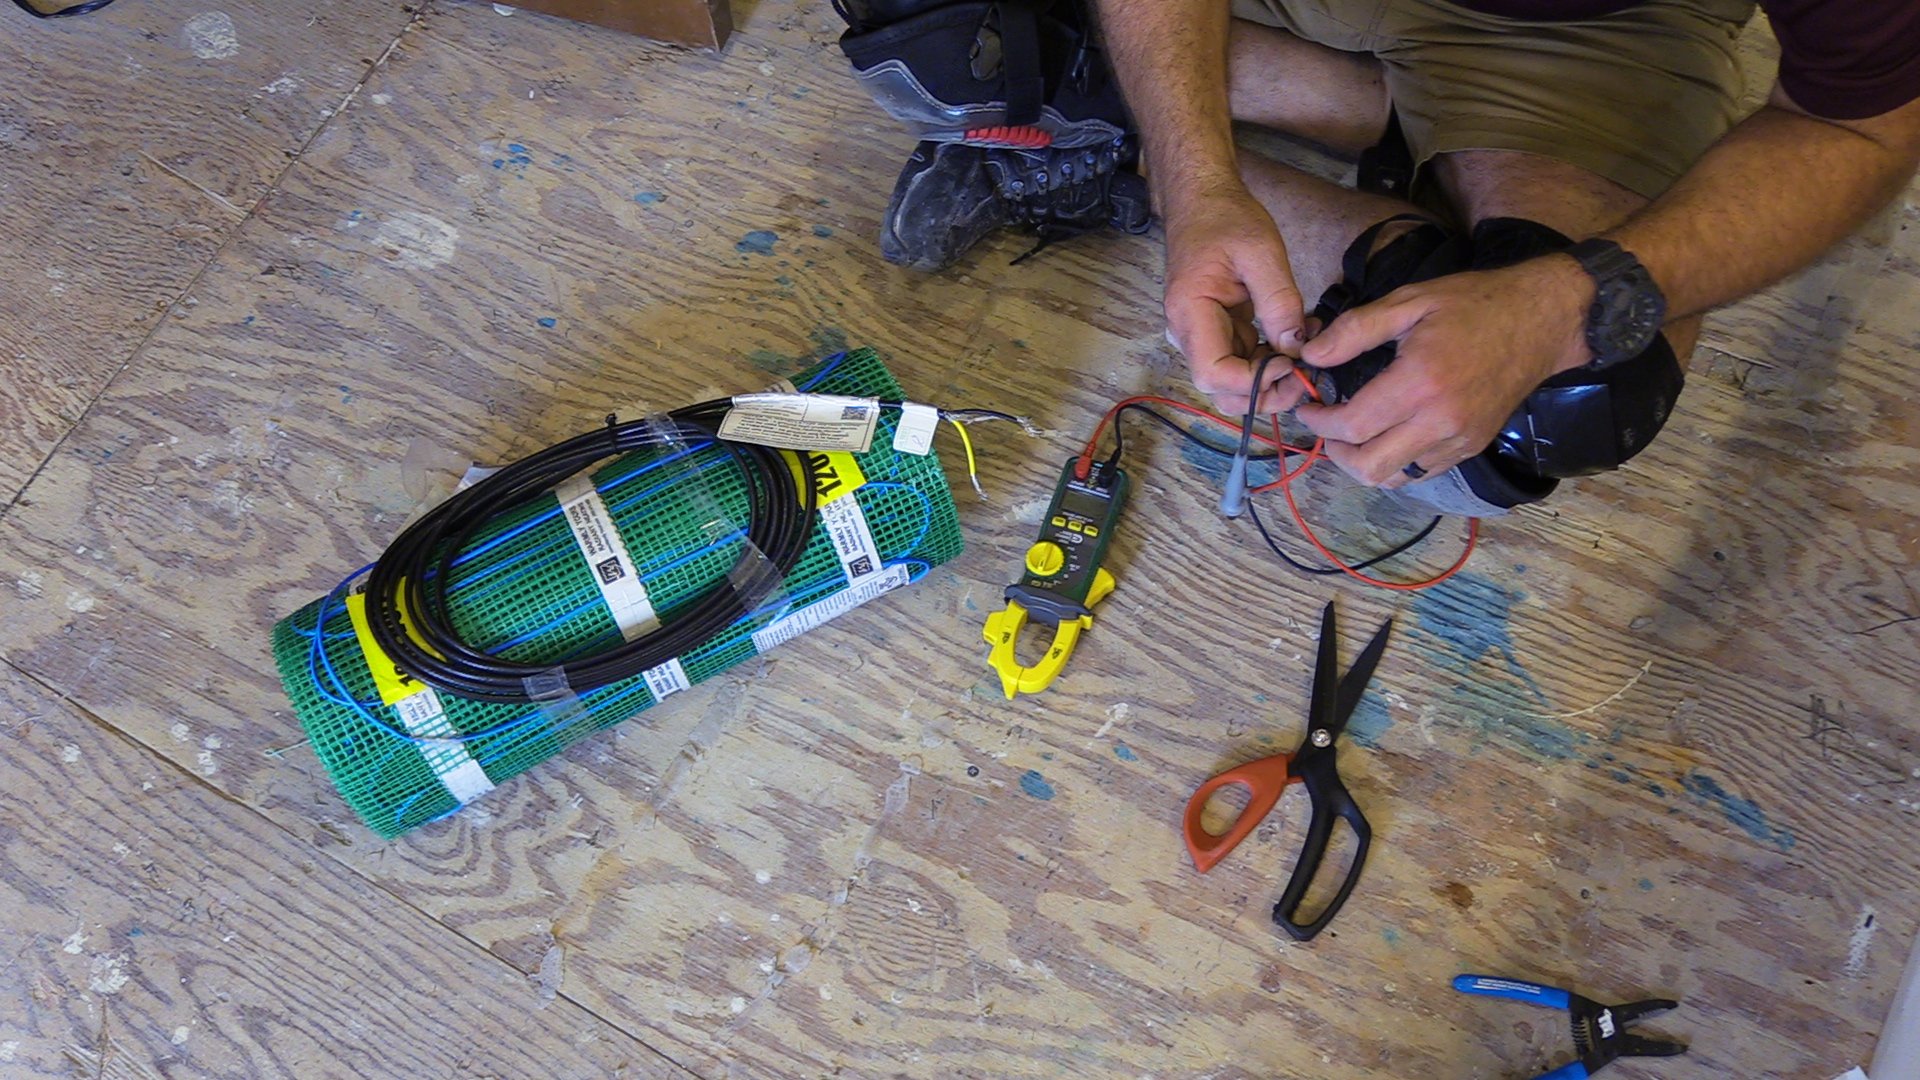
For added quality assurance, each TempZone Floor Heating Mat is tested three times at our factory—before, during, and after production. This rigorous process ensures your heating mat is in perfect working condition when it arrives at your home or job site.
4. Connect the Circuit Check
Connecting the Circuit Check device to the system wires before unrolling the mat provides an audible alert if the heating cable is cut, nicked, or damaged at any point during installation—allowing you to fix the issue before tile is installed.

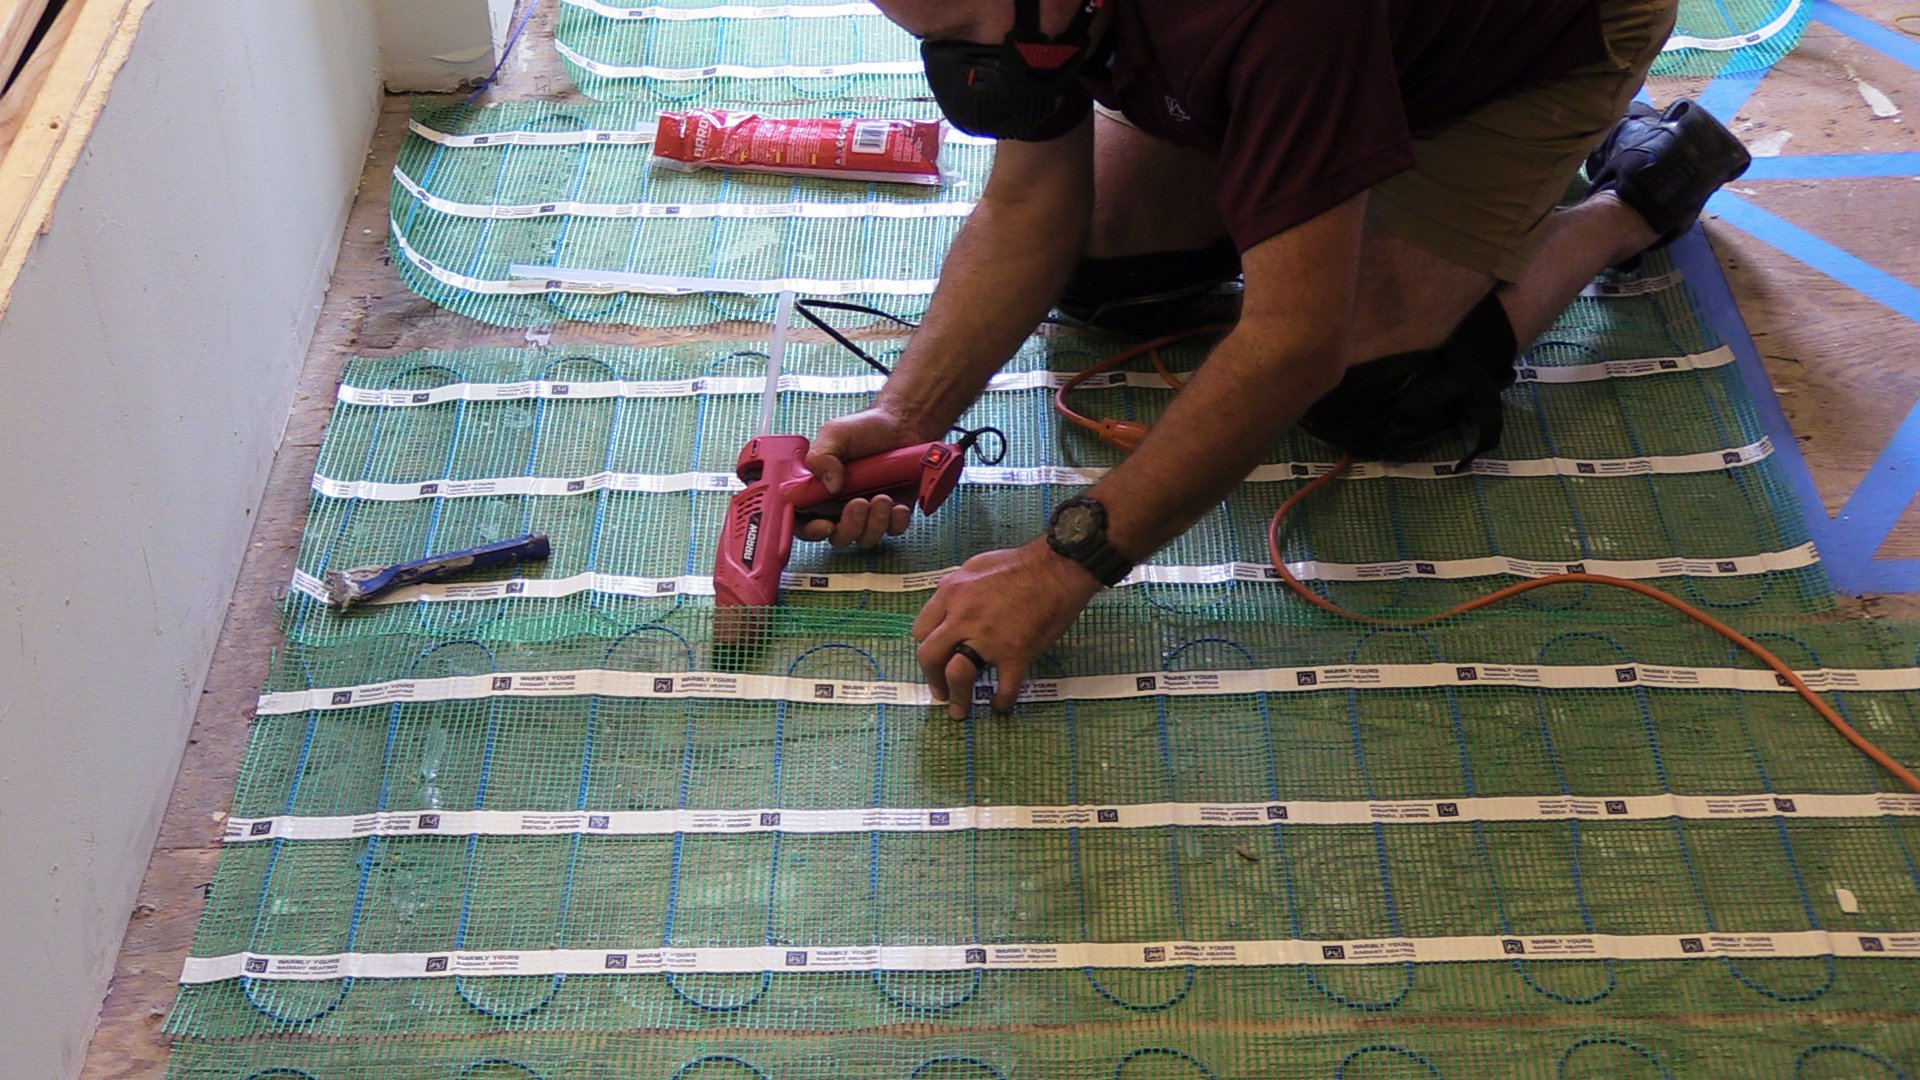
5. Lay Out the Heating Mats
Laying out the heating mats involves rolling them out according to your SmartPlan, changing direction by cutting the mesh—not the cable—and rotating the mat, and securing it to the subfloor with hot glue or tape.
6. Install the Floor Sensor (Backup included)
Installing the floor sensor requires placing the primary sensor between two heating cables and embedding a second, unconnected backup sensor in the floor, as every WarmlyYours thermostat comes with two sensors.
The active sensor should be placed between two heating cables, approximately 6 inches into the heated area. Avoid crossing it over any heating wires. Secure it using hot glue or by tucking it into the mesh per your SmartPlan.
The backup sensor remains dormant in the floor. If the primary sensor ever fails (which is rare), the backup can be connected without needing to remove tile—saving time, money, and hassle.

7. Retest the System
Retesting the system involves using a digital ohmmeter after the heating mat is installed and secured to the subfloor, confirming the heating element was not damaged before covering it with thinset or self-leveling compound.
This step confirms that the heating element has not been accidentally damaged during layout or positioning. Even small, unnoticed issues—like pressure points or minor abrasions—can cause problems if not detected now.
Compare your new reading to the previous one to ensure consistency—values should be within 15% of the UL label. Any significant difference should be addressed before proceeding.
Important: Record your ohmmeter readings on the WarmlyYours warranty document and submit it to ensure full warranty coverage. This documentation confirms the system was tested properly at key stages of installation.
8. Connect the Thermostat
Connecting the thermostat should be completed by a licensed electrician to ensure all wiring connections meet safety standards and comply with local codes.
All WarmlyYours thermostats include a built-in GFCI and floor sensor. Always use a thermostat with a built in GFCI to meet safety standards and protect against electrical issues.

We recommend placing the heating system on a dedicated circuit—while not mandatory, doing so helps prevent interference from other electrical devices and ensures the floor warming system performs at its best.
9. Apply Thinset or Self-Leveling Compound and Install Tile
Applying thinset and installing tile involves spreading a modified thinset over the heating mats, setting your tile with a leveling system to prevent lippage, and allowing the mortar to fully cure before powering on your system.
Cover the TempZone Floor Heating Mat with either a modified thinset mortar or a self-leveling compound (SLC)—both are suitable depending on your project preference and installer experience.
After embedding the heating element, set your tile directly on top. Using a tile leveling system can help prevent lippage and ensure a flat, professional-looking finish.

Watch It in Action
See how easy it is to install a TempZone Floor Heating Mat with this step-by-step video. Whether you’re a DIYer or a seasoned pro, this walkthrough highlights key installation tips and best practices so you can confidently create a warm, luxurious tile floor.
Explore Other Electric Floor Heating Products
Exploring other electric floor heating products involves checking out additional options for a heated tile floor, such as TempZone Cable or Custom Mats, if you need something more custom or flexible than TempZone Floor Heating Mats:
- TempZone™ Cable with Grip Strips – Flexible layout and budget-friendly
- TempZone™ Cable with Prodeso Membrane – Crack isolation and fast 1-day installation
- TempZone™ Custom Mats – Factory-designed to fit your exact room dimensions
Each is compatible with tile and offers efficient, reliable warmth tailored to your project’s needs.
If you are working with different floor coverings or rooms, check out our guides on installing radiant floor heating under luxury vinyl tile or installing underfloor heating in a bedroom.
Common Mistakes to Avoid When Installing Floor Heating Under Tile
Common mistakes to avoid when installing floor heating under tile include cutting the heating cable, forgetting to test with an ohmmeter, and turning the system on before the thinset has cured. Here are the most common pitfalls to avoid for a successful installation:
- Cutting the Heating Cable: Never cut or shorten the actual heating wire. If you have excess cable, you can adjust the spacing or run it along the perimeter, but cutting it will permanently destroy the system.
- Forgetting to Test with an Ohmmeter: Always test the heating element’s resistance before, during, and after installation. Failing to test means you might embed a damaged wire in thinset, which is extremely difficult and costly to repair later.
- Using the Wrong Thinset: Always use a high-quality, polymer-modified thinset mortar that is rated for use with electric floor heating systems and your specific tile type.
- Walking on the Heating Wires: Avoid walking directly on the heating cable or mat during installation. If you must walk on it, wear soft-soled shoes and place cardboard or plywood over the wires to protect them from pressure points.
- Turning the System on Too Soon: Do not turn on your floor heating system immediately after tiling. You must allow the thinset and grout to fully cure (typically 7 to 28 days, depending on the manufacturer’s instructions) to prevent cracking or weak bonds.
Tools and Support for Trade Professionals
Tools and support for trade professionals include a complete suite of resources—from a Radiant Floor Heating Quote Builder to a Support Hub—to ensure every installation is a success from pre-sales planning to post-sales technical assistance:
- Radiant Floor Heating Quote Builder
- Operating Cost Calculator
- Radiant Heating Support Hub
- Installation Videos & Webinars
Ready to Heat Things Up?
Get started with your free SmartPlan™, and let WarmlyYours help you bring comfort, efficiency, and luxury to your heated tile floor. Questions? Our radiant experts are always here to help.
- Call: 800-875-5285
- Email: info@warmlyyours.com
- Submit: Your Floor Plan for a SmartPlan
Have Questions About Your Project?
Our team of Radiant Experts is ready to help!

Related Articles
")
How to Ensure a Level Tile Floor with Radiant Floor Heating

How to Prevent Tile Cracks When Installing Radiant Floor Heating

5 Tips for Installing Tile Grout
Thinset vs. Self-Leveling when Installing Radiant Floor Heating
Stay Updated
Get the latest radiant heating news and tips delivered to your inbox.
Comments