
6 Tips For Installing Electric Floor Heating by WarmlyYours
Effortless Radiant Floor Heating Setup Tips & Tricks
Are you dreaming of stepping onto warm floors even on the coldest winter mornings? Imagine the comfort of electric infloor heating elegantly warming your home, enhancing both comfort and value.
This expert-led guide by Scott from WarmlyYours offers a straightforward approach to installing radiant floor heating. You'll discover how easy it is to integrate warmth into your living space while avoiding common pitfalls. With our tips, save money and time, and enjoy luxurious comfort.
In this video, we cover everything you need for a successful installation:
- 💡 **Never Cut the Embedded Wire:** Essential for maintaining system integrity and efficiency.
- ✅ **Use an Installation Plan:** Streamlines the process, ensuring optimal mat positioning.
- 🔥 **Avoid Permanent Fixtures:** Ensure heating isn't placed under fixtures like toilets or vents.
- 🌡️ **Test with an OHMS Meter:** Verify correct resistance values to prevent future issues.
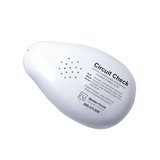
- ⚡ **Employ a Circuit Checker:** Detects potential wiring errors before they cause damage.
By following these proven techniques, you'll enjoy a cozy, energy-efficient home environment. Let the warmth embrace you as you elevate your living space with our radiant floor heating system.
Transcript
Hello, I'm Scott from WarmlyYours, and today I'd like to talk to you about electric floor heating. The installation of electric floor heating is a straightforward process, but there are several important considerations to ensure a trouble-free experience. One of the key points to remember is that when installing the heating roll, you must never cut the wire that is embedded in the mesh. This electric floor heating system consists of three wires: one that runs from the end of the mat, another that runs to the beginning, and a third that is sewn into the mat itself. The wires at both ends of the mat can be cut when they are connected to the wall and wired to your thermostat; these are referred to as cold leads. However, the wire within the mesh must never be cut. While you can shorten the mesh itself, cutting the wire is not an option. To ensure a smooth installation, always remember this crucial rule: never cut the wire in the mesh.
Additionally, I recommend obtaining an installation plan if possible. This plan will help you position the system optimally, as we do the planning for you. All you need to do is cut the panels to the correct length and place them on the floor, making the installation process very simple. If you are installing the system in a bathroom or kitchen, it is essential to inform us about any permanent fixtures that will be on the floor, such as toilets, air vents, or kitchen islands. Electric floor heating should never be placed under permanent fixtures, so please keep us informed about these details.
When you unpack the mat, always test it with an OHMS meter. This step is crucial as it allows you to verify that the mat has the correct OHMS resistance value as specified by the factory. Testing the mat upon receipt is an important precaution. While you are installing the mat, it is also advisable to use a circuit checker. This tool can be attached to the wires of the cold lead and will alert you if any mistakes have been made, such as nicking, cutting, or bending the wire too tightly. If an alarm sounds, it indicates that something is wrong, prompting you to stop and inspect your work to ensure that no damage has occurred.
Finally, remember that WarmlyYours has the best-trained technical support team in the floor heating industry. We are available 24/7 to assist you with any issues that may arise during your installation. Don’t hesitate to reach out to us if you encounter any problems; we are here to help. My name is Scott from WarmlyYours, and I appreciate you taking the time to watch this video. Thank you!
Bonjour, je suis Scott de WarmlyYours, et aujourd'hui j'aimerais vous parler du chauffage électrique par le sol. L'installation d'un plancher chauffant électrique est un processus simple, mais il y a plusieurs points importants à prendre en compte pour garantir une expérience sans problème. L'un des points essentiels à retenir est que, lors de l'installation du rouleau chauffant, il ne faut jamais couper le fil qui est incorporé dans le treillis. Ce système de chauffage électrique par le sol se compose de trois fils : un qui part de l'extrémité de la natte, un autre qui va jusqu'au début et un troisième qui est cousu dans la natte elle-même. Les fils situés aux deux extrémités de la natte peuvent être coupés lorsqu'ils sont raccordés au mur et reliés à votre thermostat ; il s'agit de fils froids. En revanche, le fil à l'intérieur du treillis ne doit jamais être coupé. Vous pouvez raccourcir le treillis lui-même, mais il n'est pas possible de couper le fil. Pour que l'installation se déroule sans accroc, n'oubliez jamais cette règle essentielle : ne coupez jamais le fil du grillage.
En outre, je recommande d'obtenir un plan d'installation si possible. Ce plan vous aidera à positionner le système de manière optimale, car nous nous chargeons de la planification pour vous. Il vous suffit de couper les panneaux à la bonne longueur et de les placer sur le sol, ce qui rend le processus d'installation très simple. Si vous installez le système dans une salle de bain ou une cuisine, il est essentiel de nous informer de tout élément permanent qui se trouvera sur le sol, comme les toilettes, les bouches d'aération ou les îlots de cuisine. Le chauffage électrique par le sol ne doit jamais être placé sous des installations permanentes.
Lorsque vous déballez la natte, testez-la toujours à l'aide d'un appareil de mesure OHMS. Cette étape est cruciale car elle vous permet de vérifier que la natte a la valeur de résistance OHMS correcte telle que spécifiée par l'usine. Le test du tapis à la réception est une précaution importante. Pendant que vous installez le tapis, il est également conseillé d'utiliser un vérificateur de circuit. Cet outil peut être attaché aux fils de la liaison froide et vous alertera si des erreurs ont été commises, telles qu'une entaille, une coupure ou un pliage trop serré du fil. Si une alarme se déclenche, c'est que quelque chose ne va pas, ce qui vous incite à vous arrêter et à inspecter votre travail pour vous assurer qu'aucun dommage n'est survenu.
Enfin, n'oubliez pas que WarmlyYours dispose de l'équipe d'assistance technique la mieux formée de l'industrie du chauffage par le sol. Nous sommes disponibles 24 heures sur 24 et 7 jours sur 7 pour vous aider à résoudre les problèmes qui pourraient survenir au cours de votre installation. N'hésitez pas à nous contacter en cas de problème, nous sommes là pour vous aider. Je m'appelle Scott, de WarmlyYours, et je vous remercie d'avoir pris le temps de regarder cette vidéo. Je vous remercie de votre attention et vous prie d'agréer, Madame, Monsieur, mes salutations distinguées
Hola, soy Scott de WarmlyYours, y hoy me gustaría hablarles sobre la calefacción por suelo radiante eléctrico. La instalación de calefacción por suelo radiante eléctrico es un proceso sencillo, pero hay varias consideraciones importantes para garantizar una experiencia sin problemas. Uno de los puntos clave que hay que recordar es que, al instalar el rollo calefactor, nunca se debe cortar el alambre que está incrustado en la malla. Este sistema de calefacción por suelo radiante eléctrico consta de tres cables: uno que va desde el extremo de la malla, otro que va hasta el principio y un tercero que está cosido a la propia malla. Los cables de los extremos de la malla pueden cortarse cuando se conectan a la pared y se cablean con el termostato; se denominan cables fríos. Sin embargo, el cable de la malla no debe cortarse nunca. Aunque puede acortar la propia malla, cortar el cable no es una opción. Para garantizar una instalación sin problemas, recuerde siempre esta regla fundamental: nunca corte el cable de la malla.
Además, recomiendo obtener un plano de instalación si es posible. Este plano le ayudará a colocar el sistema de forma óptima, ya que nosotros hacemos la planificación por usted. Todo lo que tiene que hacer es cortar los paneles a la longitud correcta y colocarlos en el suelo, con lo que el proceso de instalación es muy sencillo. Si va a instalar el sistema en un cuarto de baño o una cocina, es esencial que nos informe de cualquier accesorio permanente que vaya a haber en el suelo, como inodoros, salidas de aire o islas de cocina. La calefacción por suelo radiante eléctrico nunca debe colocarse debajo de accesorios permanentes, por lo que le rogamos que nos mantenga informados sobre estos detalles.
Cuando desembale la alfombrilla, pruébela siempre con un medidor de OHMS. Este paso es crucial, ya que le permite verificar que la placa tiene el valor de resistencia OHMS correcto especificado de fábrica. Probar la alfombrilla al recibirla es una precaución importante. Mientras instala la alfombrilla, también es aconsejable utilizar un comprobador de circuitos. Esta herramienta puede fijarse a los cables del cable frío y le avisará si se ha cometido algún error, como cortar, mellar o doblar el cable con demasiada fuerza. Si suena una alarma, indica que algo va mal, lo que te obliga a parar e inspeccionar tu trabajo para asegurarte de que no se ha producido ningún daño.
Por último, recuerde que WarmlyYours cuenta con el equipo de asistencia técnica mejor formado del sector de la calefacción por suelo radiante. Estamos disponibles 24/7 para ayudarle con cualquier problema que pueda surgir durante su instalación. No dude en ponerse en contacto con nosotros si tiene algún problema; estamos aquí para ayudarle. Mi nombre es Scott de WarmlyYours, y le agradezco que se haya tomado el tiempo de ver este vídeo. Muchas gracias
Witam, jestem Scott z WarmlyYours, a dziś chciałbym porozmawiać o elektrycznym ogrzewaniu podłogowym. Instalacja elektrycznego ogrzewania podłogowego jest prostym procesem, ale należy wziąć pod uwagę kilka ważnych kwestii, aby zapewnić bezproblemową pracę. Jednym z kluczowych punktów, o których należy pamiętać, jest to, że podczas instalacji rolki grzewczej nigdy nie wolno przecinać drutu osadzonego w siatce. Ten elektryczny system ogrzewania podłogowego składa się z trzech przewodów: jednego, który biegnie od końca maty, drugiego, który biegnie do początku i trzeciego, który jest wszyty w samą matę. Przewody na obu końcach maty można przeciąć, gdy są one podłączone do ściany i podłączone do termostatu; są one określane jako zimne przewody. Jednakże, przewód wewnątrz siatki nigdy nie może zostać przecięty. O ile samą siatkę można skrócić, o tyle przecięcie drutu nie wchodzi w grę. Aby zapewnić płynną instalację, zawsze należy pamiętać o tej kluczowej zasadzie: nigdy nie przecinaj drutu w siatce.
Dodatkowo, jeśli to możliwe, zalecam uzyskanie planu instalacji. Plan ten pomoże w optymalnym rozmieszczeniu systemu, ponieważ planowanie wykonujemy za Ciebie. Wszystko, co musisz zrobić, to przyciąć panele do odpowiedniej długości i umieścić je na podłodze, dzięki czemu proces instalacji jest bardzo prosty. Jeśli instalujesz system w łazience lub kuchni, koniecznie poinformuj nas o wszelkich stałych elementach, które będą znajdować się na podłodze, takich jak toalety, otwory wentylacyjne lub wyspy kuchenne. Elektryczne ogrzewanie podłogowe nigdy nie powinno być umieszczane pod stałymi elementami wyposażenia, dlatego prosimy o informowanie nas o tych szczegółach.
Po rozpakowaniu maty należy zawsze przetestować ją za pomocą miernika OHMS. Ten krok jest kluczowy, ponieważ pozwala zweryfikować, czy mata ma prawidłową wartość rezystancji OHMS określoną przez fabrykę. Testowanie maty po jej otrzymaniu jest ważnym środkiem ostrożności. Podczas instalacji maty zaleca się również użycie narzędzia do sprawdzania obwodów. Narzędzie to można przymocować do przewodów zimnego przewodu i będzie ono ostrzegać o popełnionych błędach, takich jak nacięcie, przecięcie lub zbyt mocne zgięcie przewodu. Jeśli włączy się alarm, oznacza to, że coś jest nie tak, co skłania do zatrzymania się i sprawdzenia swojej pracy, aby upewnić się, że nie doszło do żadnych uszkodzeń.
Na koniec pamiętaj, że WarmlyYours ma najlepiej wyszkolony zespół wsparcia technicznego w branży ogrzewania podłogowego. Jesteśmy dostępni 24 godziny na dobę, 7 dni w tygodniu, aby pomóc we wszelkich kwestiach, które mogą pojawić się podczas instalacji. Nie wahaj się skontaktować z nami, jeśli napotkasz jakiekolwiek problemy; jesteśmy tutaj, aby pomóc. Nazywam się Scott z WarmlyYours i jestem wdzięczny za poświęcenie czasu na obejrzenie tego filmu. Dziękuję!
Related Resources
-

PDF · TZ-QUICK-START-OVERVIEW-30002-B
TempZone™ Quick Installation Guide (Single & Twin) (English)
TZ-Quick-Start-Overview (Single & Twin)_30002-B
-
Product · SS-01
Circuit Check
This exclusive tool was developed by WarmlyYours to give you peace of mind and ensure trouble-free installation of your radiant floor heating system. Circuit Check™ beeps immedi...
-
-
Guide
5 DIY Tile Installation Mistakes to Avoid with Radiant Floor Heating
Avoid costly DIY tile installation errors! Learn expert tips on prepping your subfloor, protecting radiant floor heating systems, and ensuring a flawless finish.
-
Video
TempZone™ Flex Roll Installation Guide Part 2 - Installing Your Floor Warming Roll
Discover expert tips for installing floor heating rolls. Enhance comfort and efficiency today with our step-by-step guide!

Related Questions
Showing all 3 questions
No. Heating elements should only be installed in usable floor areas. Avoid placing them under permanent fixtures like bathtubs, toilets, and vanities.
Why Not Under Fixtures:
Bathtubs:
- Heating under a tub wastes energy (the tub insulates the heat)
- Creates unnecessary heat that doesn't benefit the bathroom
- Difficult to access if repairs are needed
- Risk of damage during tub installation or maintenance
Toilets:
- No benefit to heating under a toilet
- Wastes energy
- Complicates installation and future repairs
Vanities & Cabinets:
- Heat is trapped and wasted
- Can damage cabinet materials over time
- Reduces system efficiency
Where to Install Heating Elements:
Focus on:
- Open floor areas where people walk barefoot
- In front of the vanity (where you stand to brush teeth, wash hands)
- Around the toilet base (for comfort and safety)
- Entrance areas (for that luxurious warm floor feeling)
- Any open floor space
Measure Your Usable Floor Area:
Step 1: Measure total bathroom dimensions
- Length and width of the room
Step 2: Identify and exclude permanent fixtures
- Bathtub footprint
- Toilet base
- Vanity footprint
- Built-in cabinets or shelving
Step 3: Calculate usable floor area
- Total square footage minus fixture areas = Heated area
Example:
- Total bathroom: 50 sq.ft.
- Bathtub: 10 sq.ft.
- Toilet: 2 sq.ft.
- Vanity: 8 sq.ft.
- Usable heated area: 30 sq.ft.
Get Expert Help:
Submit your floor plan to WarmlyYours and our engineers will:
- Identify the optimal usable floor area
- Recommend the right product size
- Create a custom installation diagram
- Provide an itemized quote
Get a free SmartPlan™ (delivered in one business day) or use the Quote Builder for instant pricing.
Bottom Line: Install heating elements only in open floor areas where people walk barefoot. This maximizes comfort, efficiency, and cost-effectiveness while avoiding wasted energy under fixtures.
A successful floor heating project requires careful planning and execution. Key steps include verifying your subfloor is clean and level, mapping out no-heat zones, performing multimeter tests before and after installation, and taking photos of the layout and sensor placement before applying thinset.
Please keep in mind that you must check your electric floor heating system with a digital ohmmeter in conjunction with a Circuit Check™. Take an initial reading as soon as you take the product out of the box to verify that it is within -5% / +10% of the values stated on the product’s label. This will give you a basis of comparison for future readings. Take a second reading once you have positioned the system to match your custom installation plan. It is also advisable to take an additional reading in the middle of the tile installation, just to make sure that the Circuit Check™ is doing its job. Then, take a final reading when you are finished with the floor installation and are ready to hook up the thermostat.
The Circuit Check™ is a tool developed by WarmlyYours to give you peace of mind and ensure trouble-free installations. Simply hook up the cold leads to the tool while you position the system to match your custom installation plan.
The Circuit Check™ will continuously monitor the continuity of the circuit during the installation of your system and during the installation of your flooring. The Circuit Check™ beeps immediately when a short in the system is detected, alerting you to a potentially damaged cable in the area you are working, before you lay the tile over the electric floor heating system. The WarmlyYours technical support team is available 24/7 to provide assistance if the alarm sounds, or if you would have any questions during your installation.
Get a Free Floor Heating Quote
Our Radiant Experts are ready to help. Start with a free, no-obligation quote for your project.


